Monthly Archives: December 2014

Installing The Grill

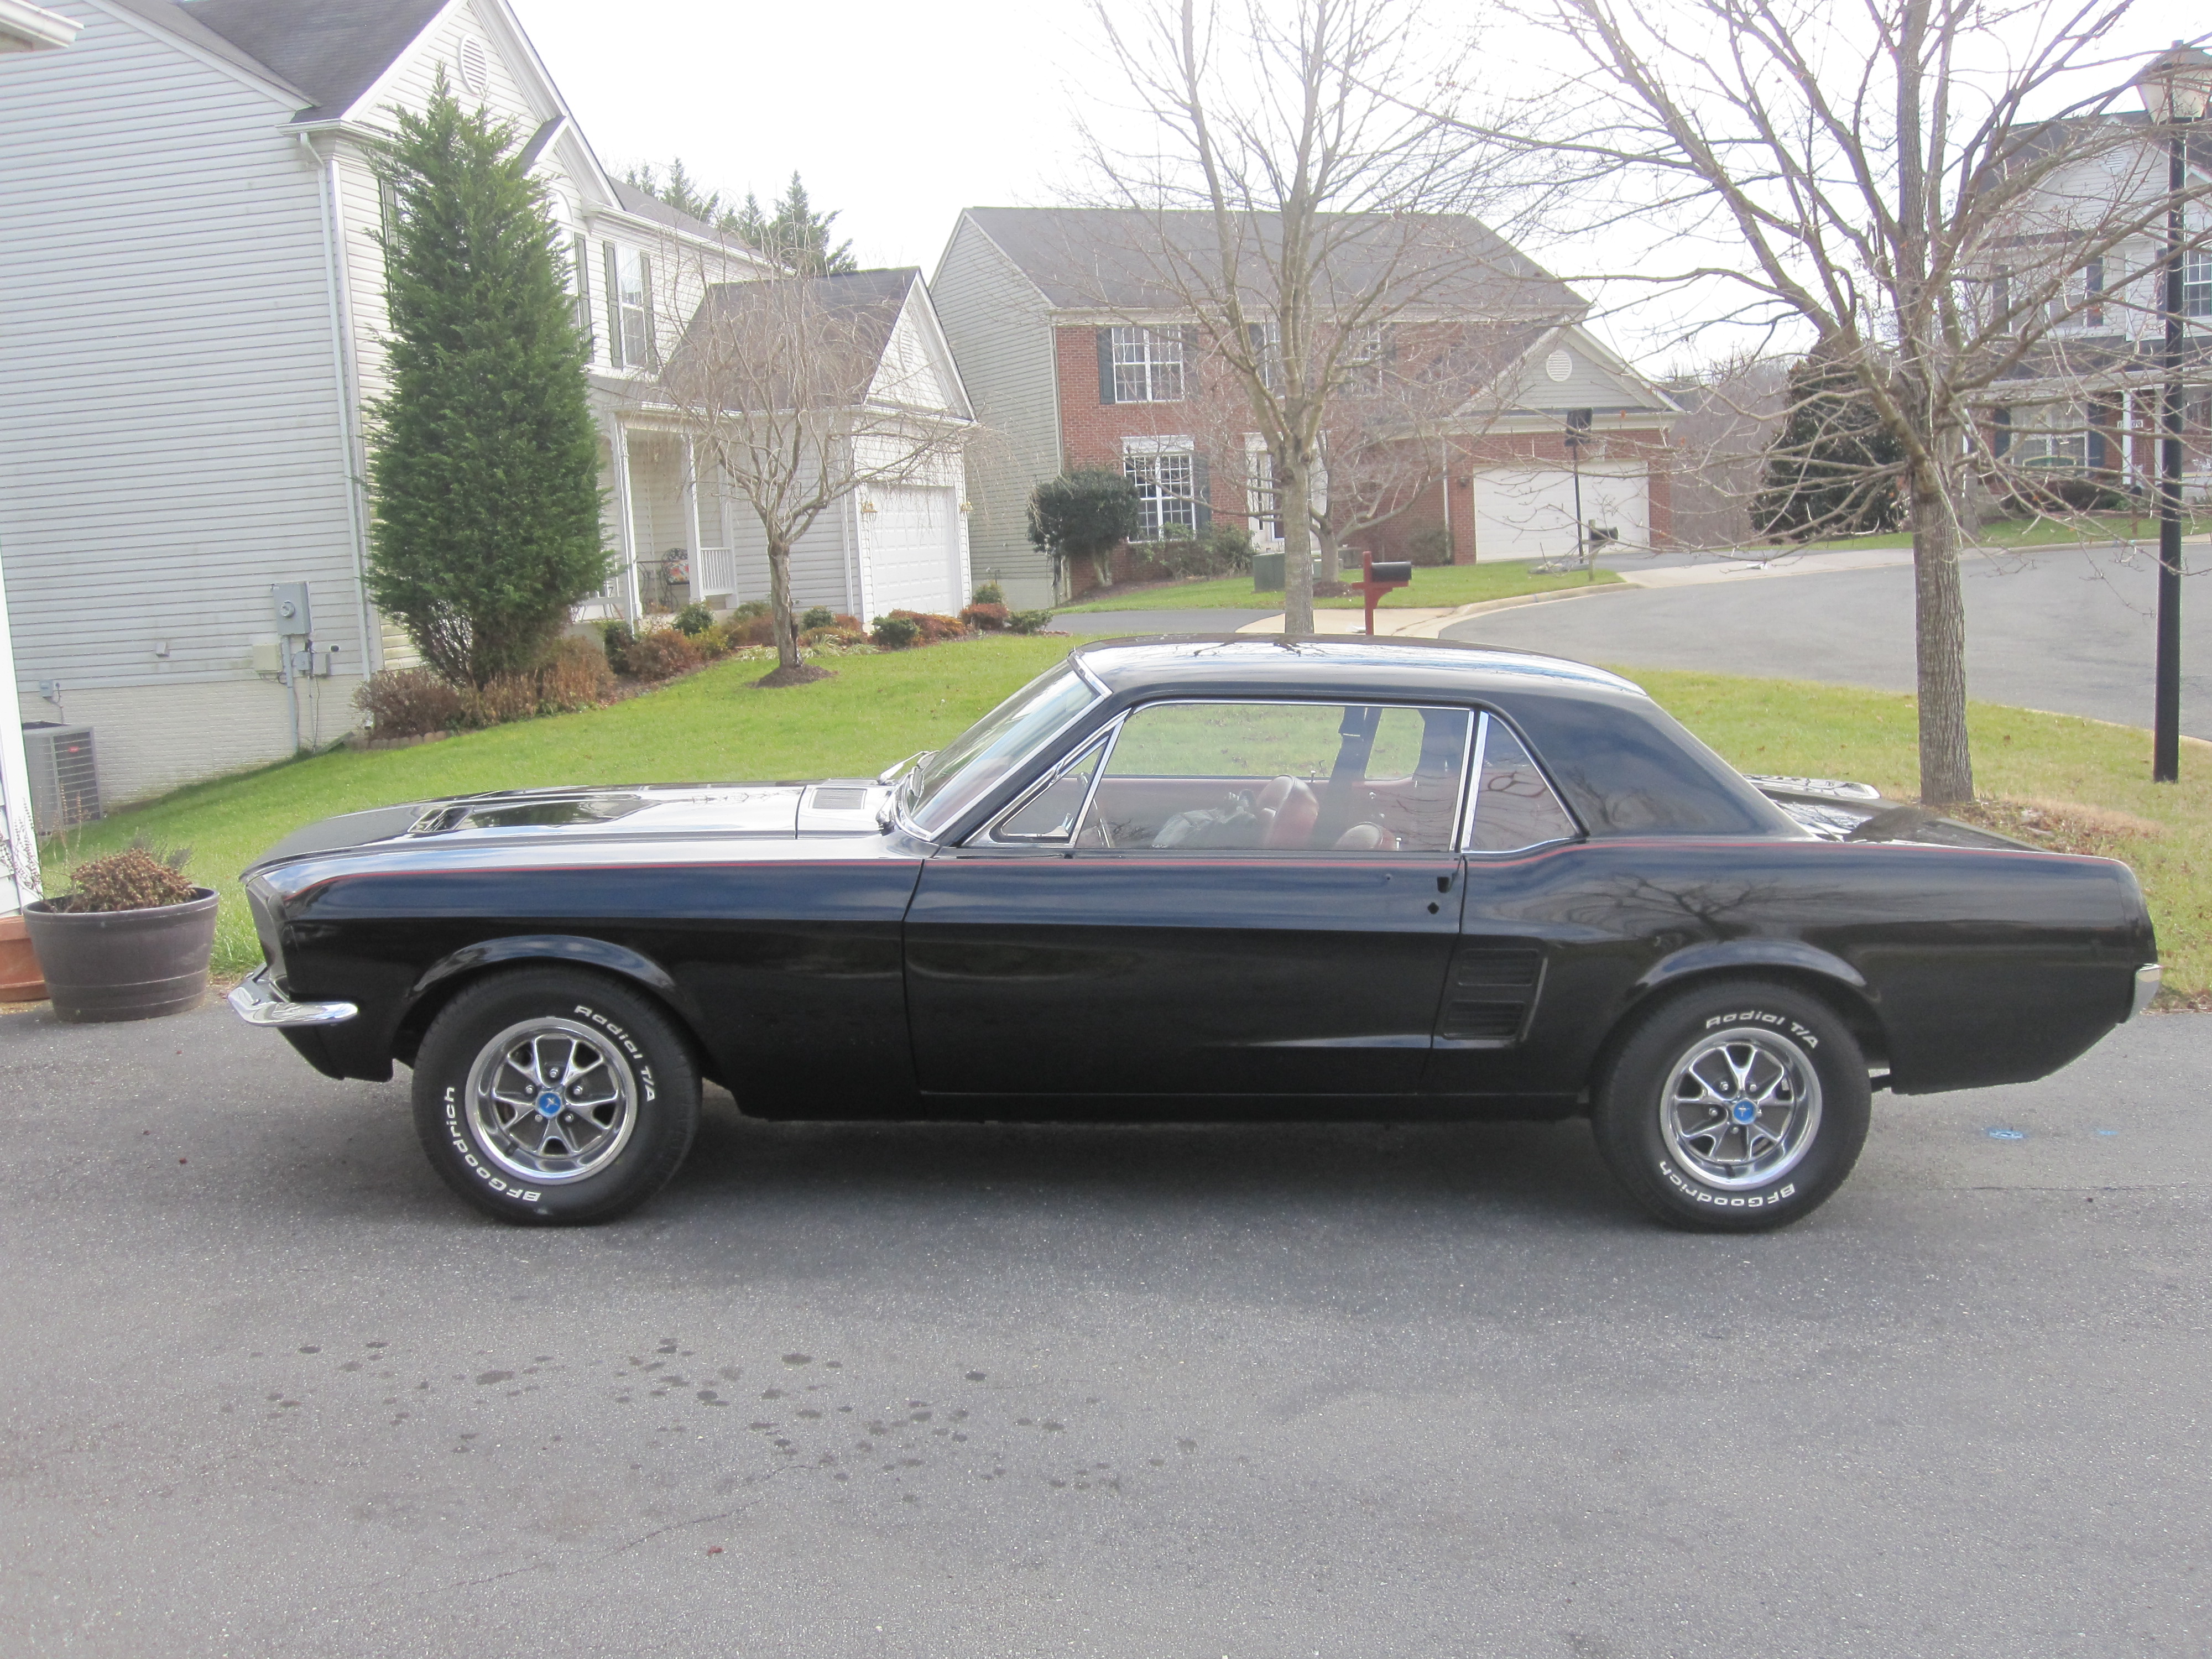
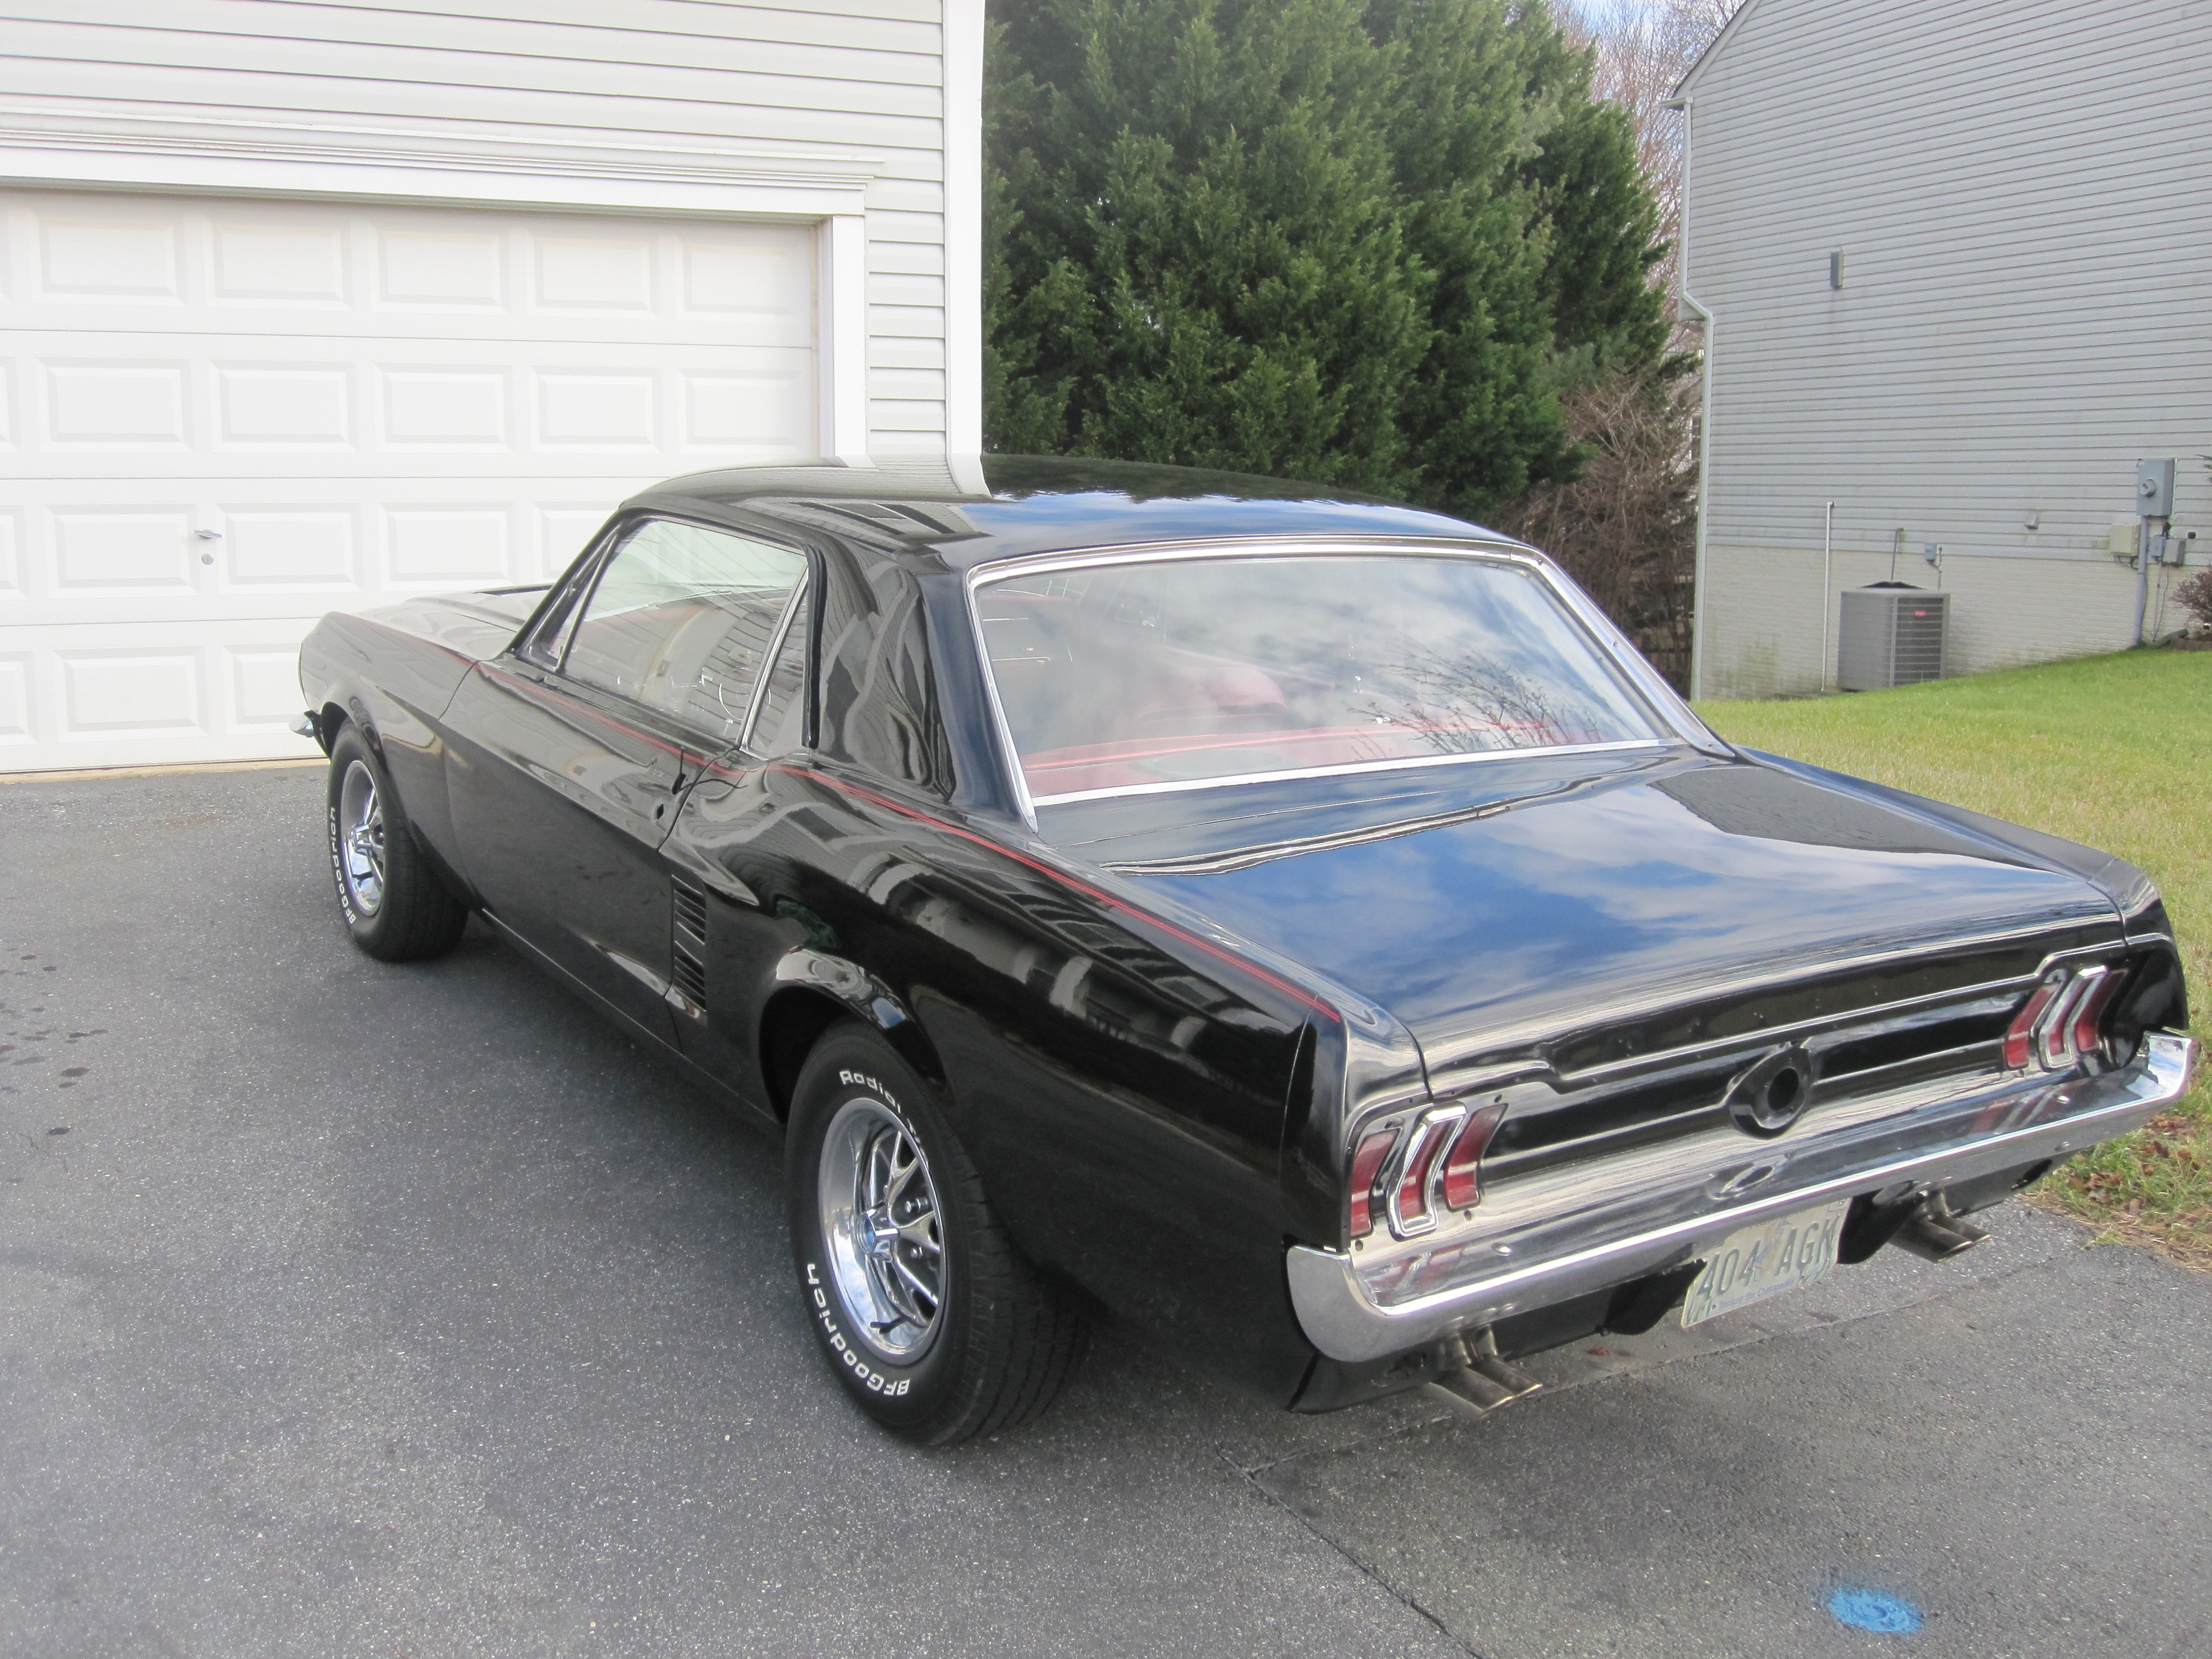
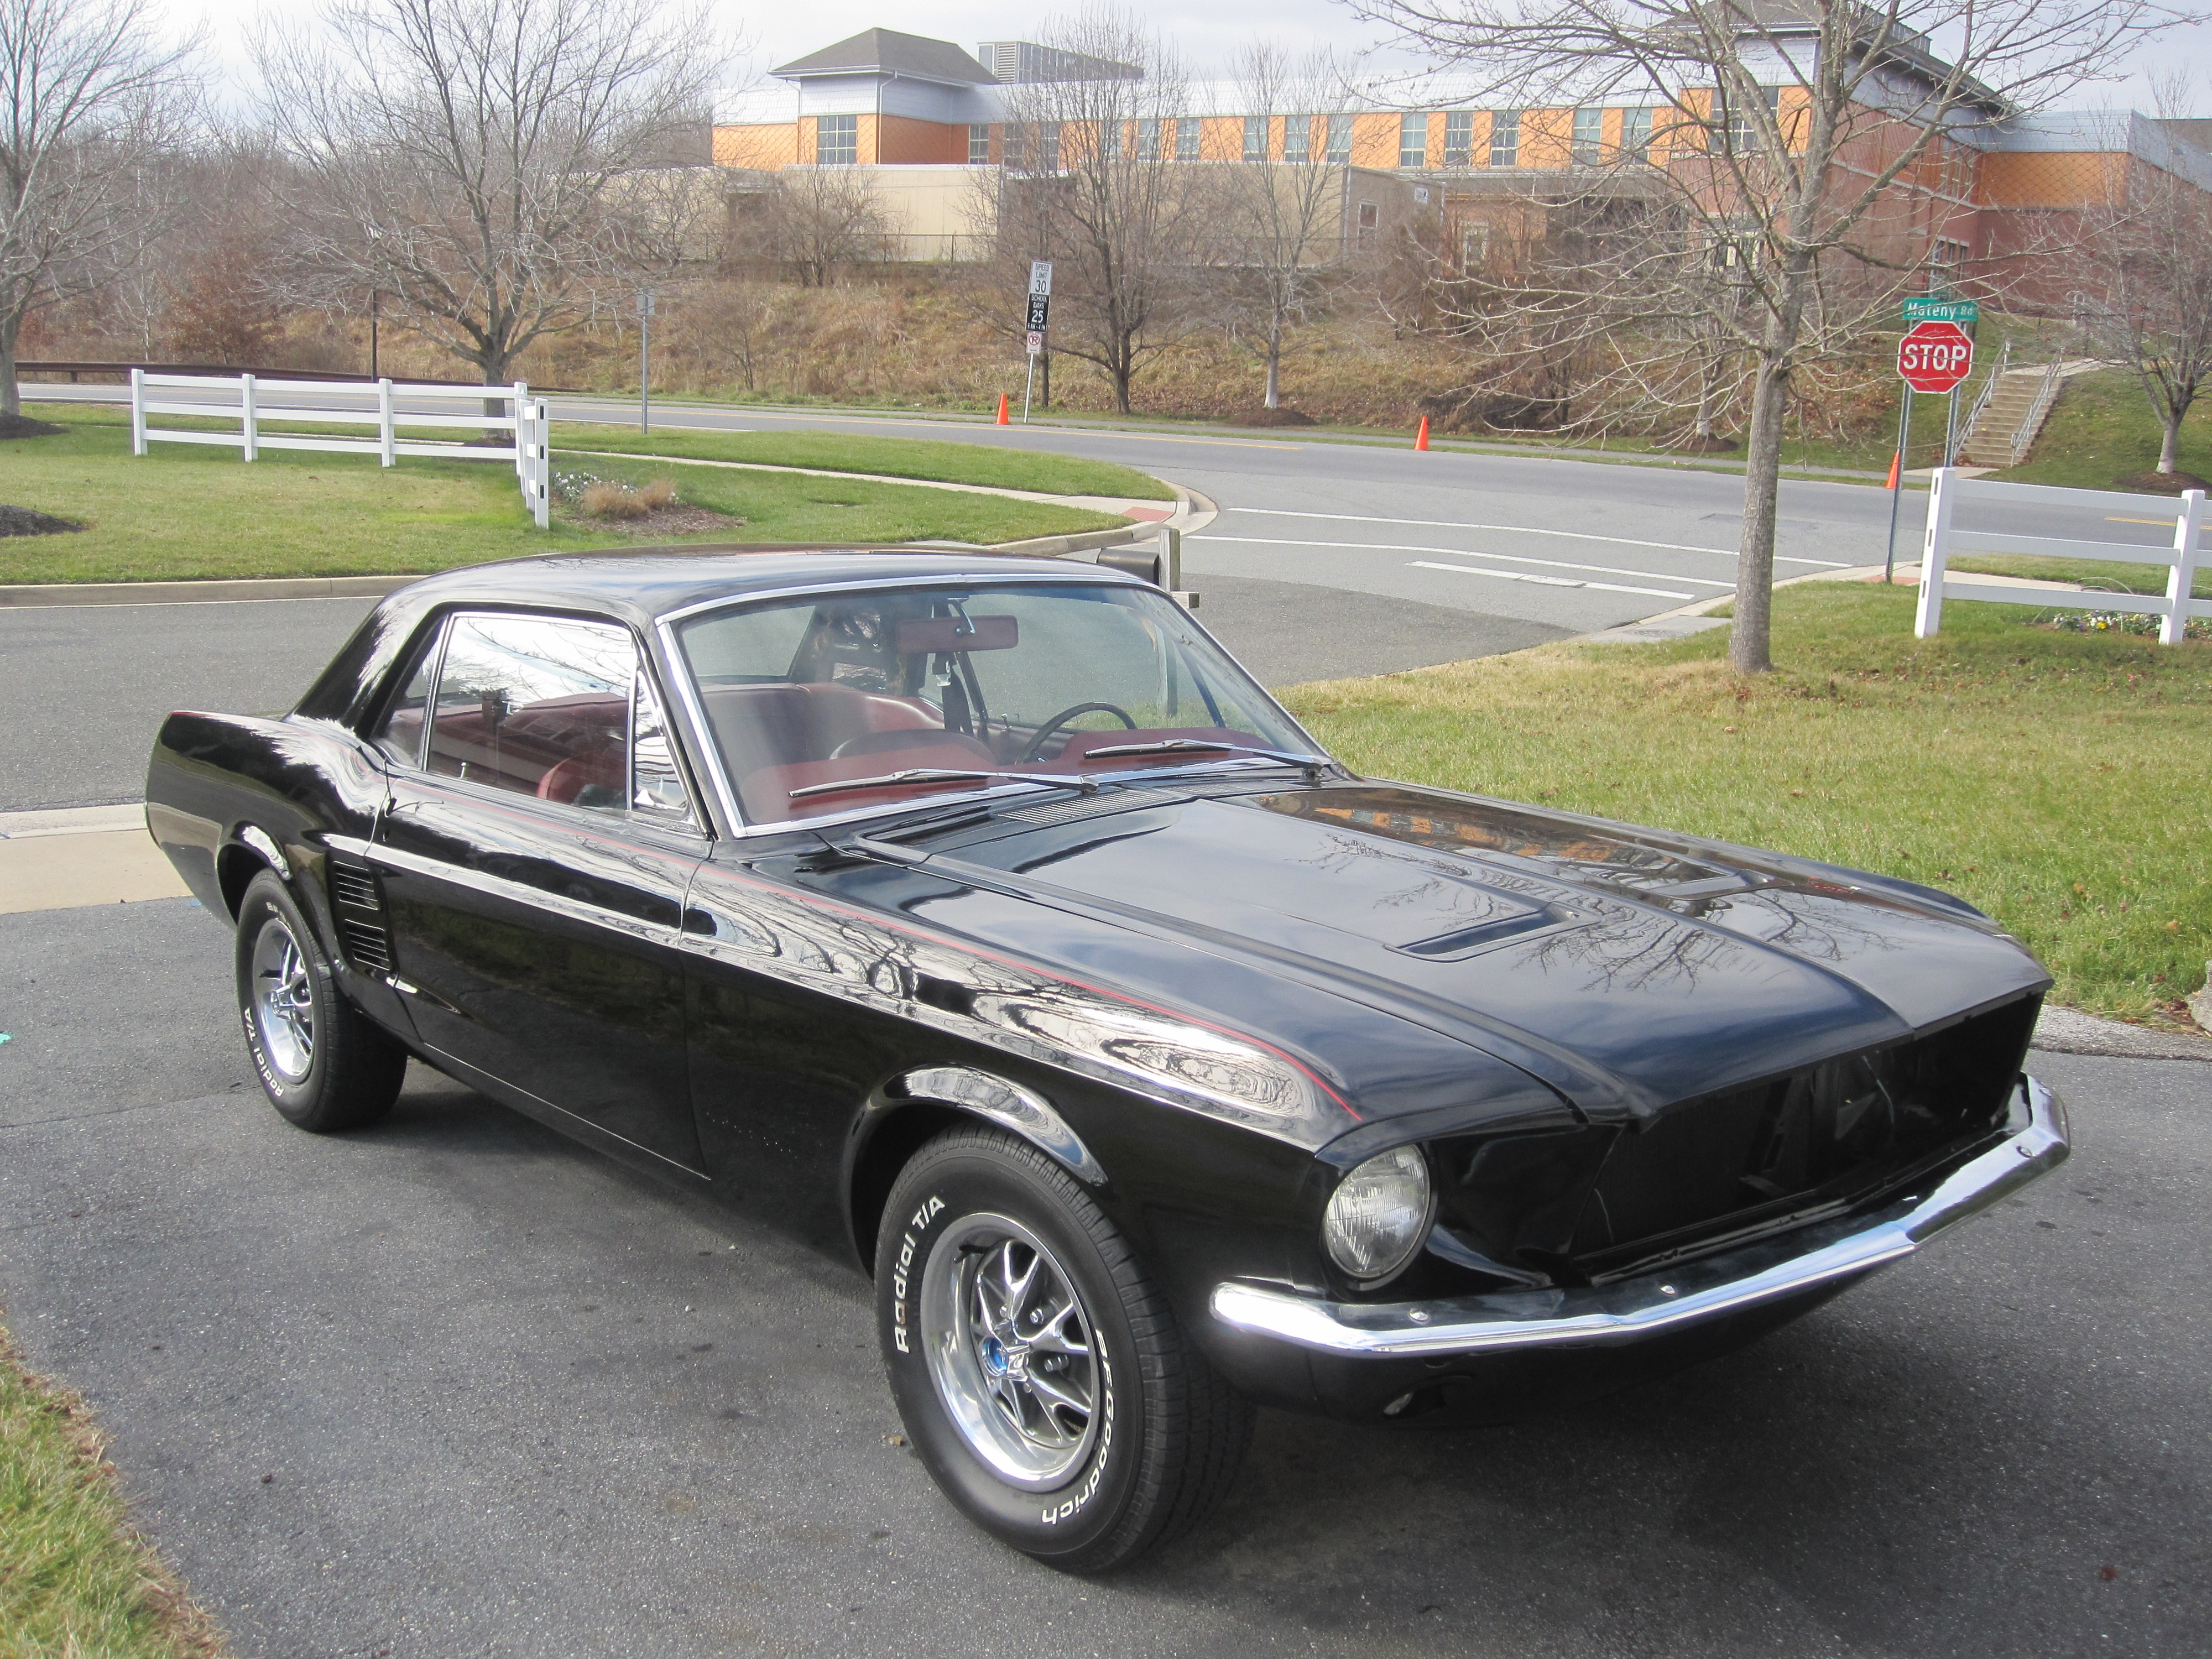
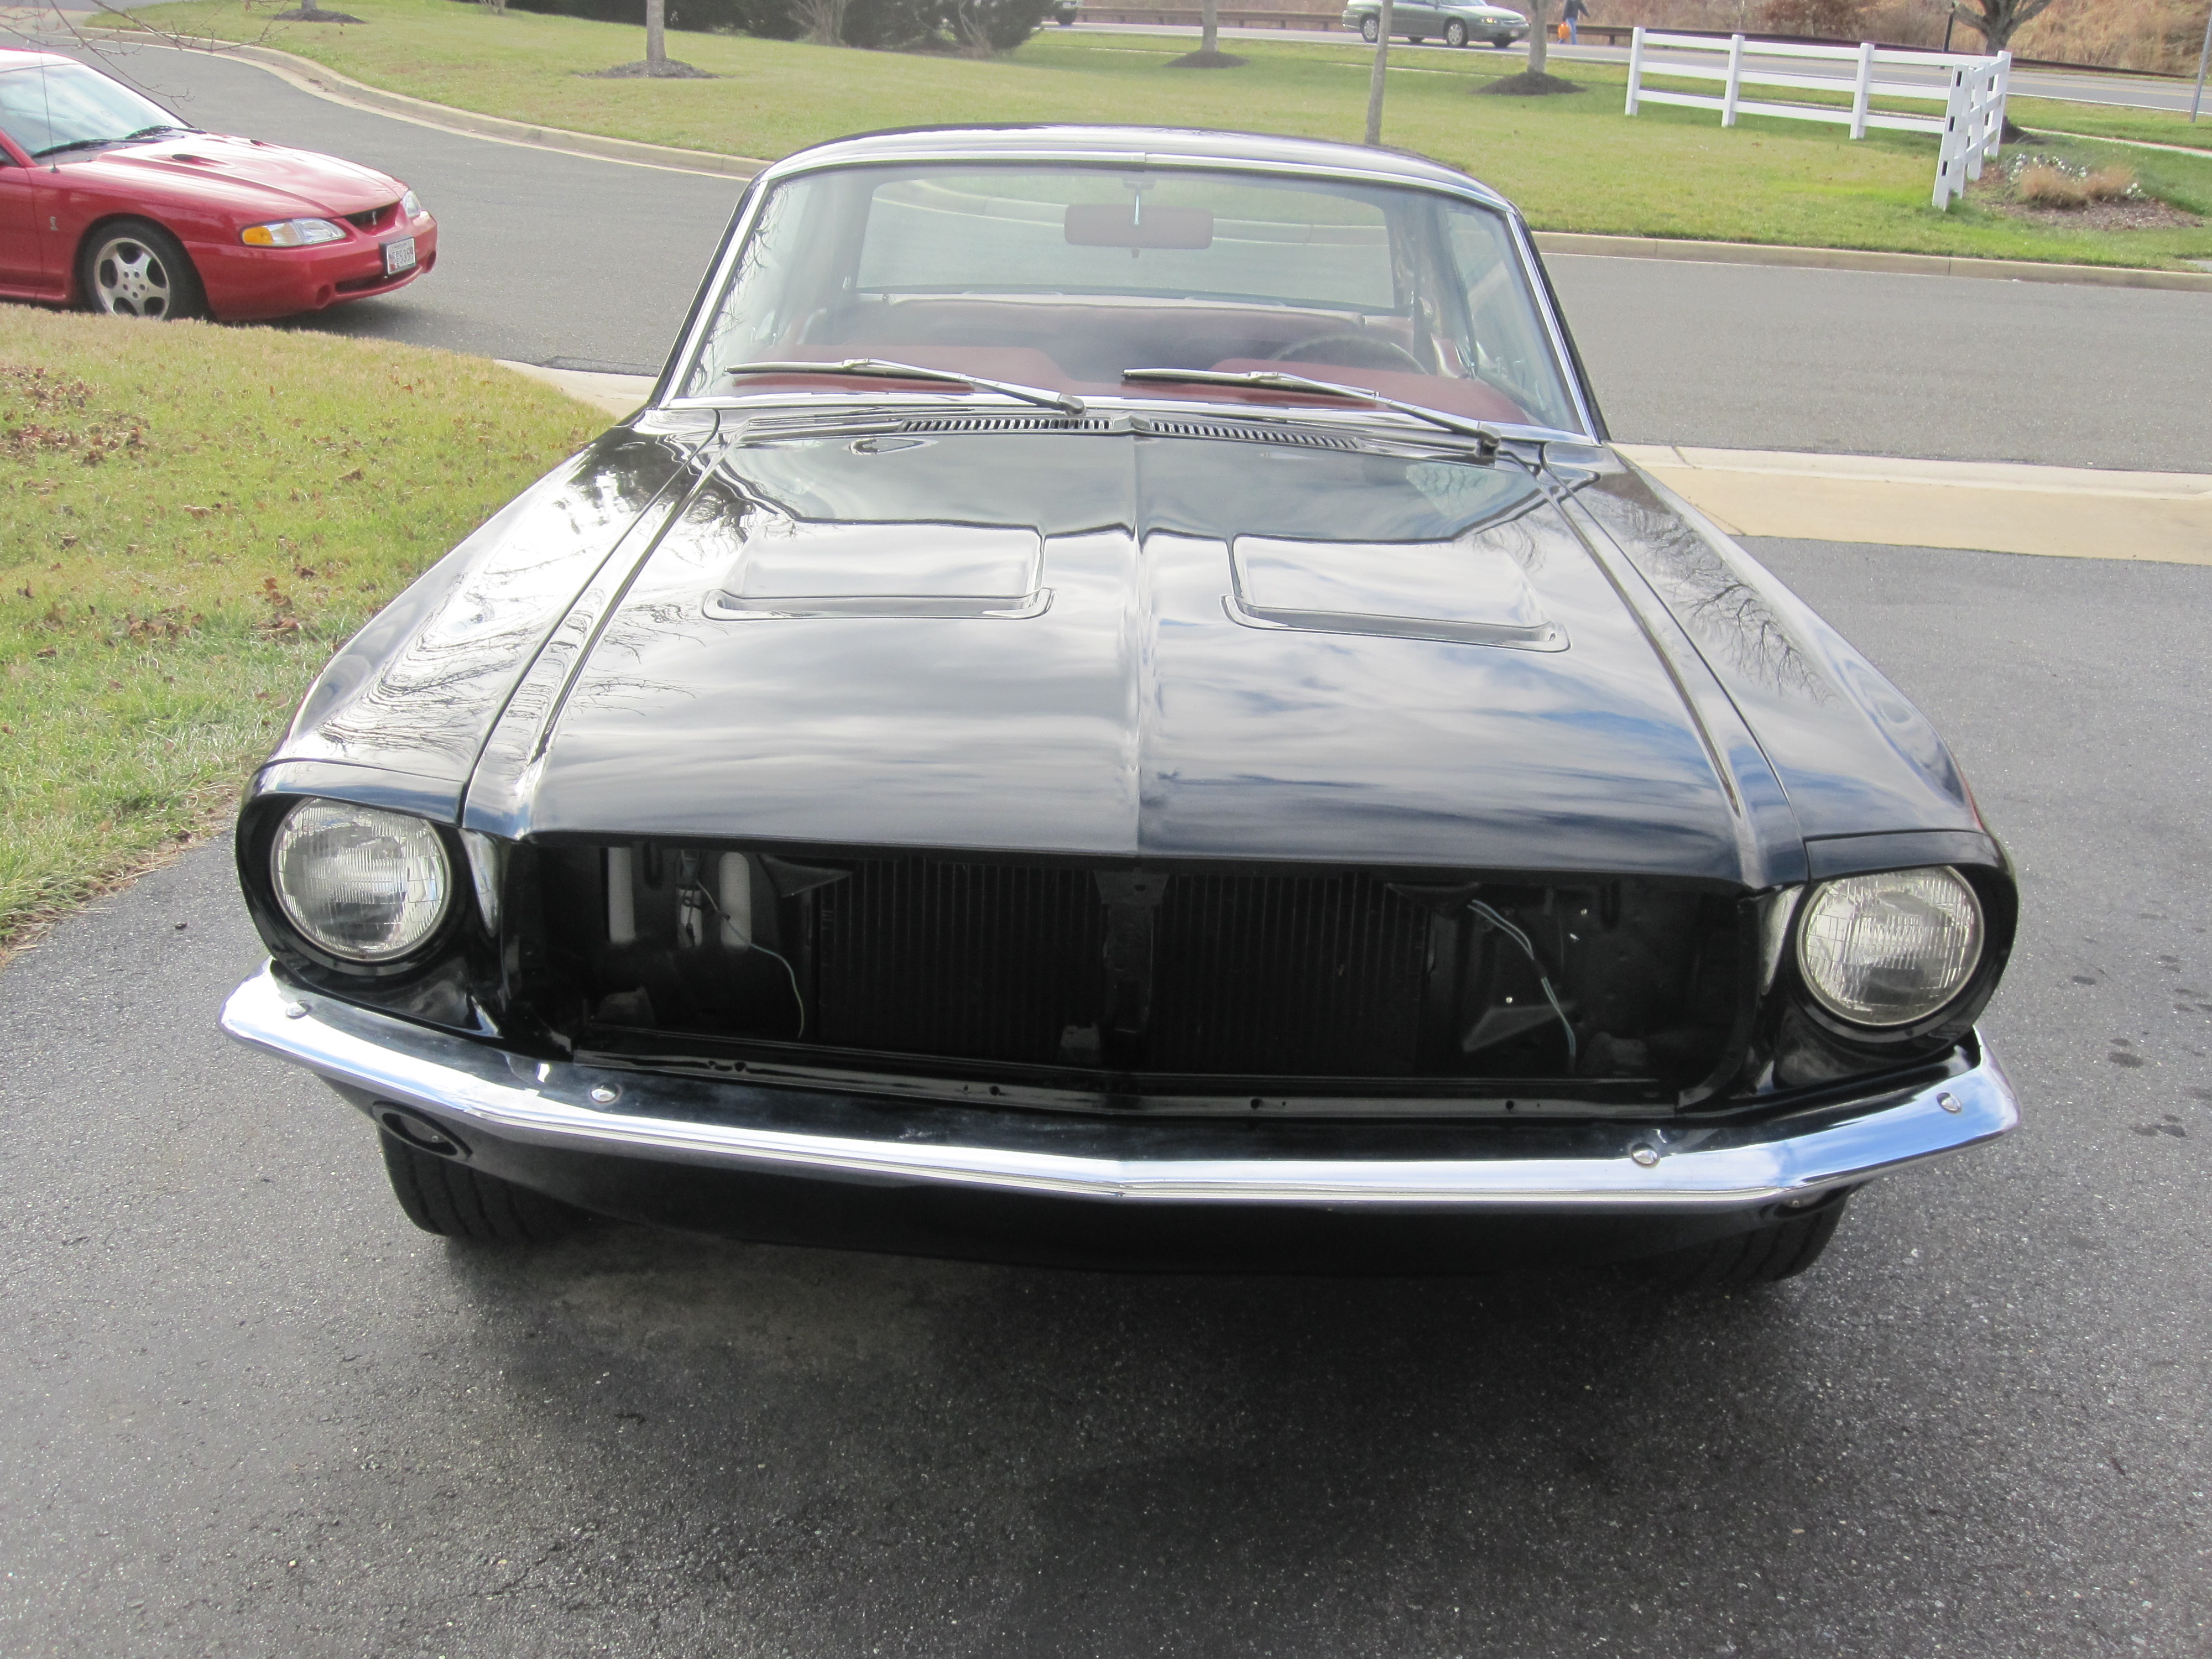
We had another nice weather day and I had some free “away from family” time.  I decided that I could get the most “bang for the buck” by working on the trim for the front of the car.  The car’s “mouth” looked pretty lonely without a grill or trim.  I had already refurbished most of the parts and purchased  new mounting hardware so I was able to just jump right in.

First up was the wide trim that is installed in front of the grill.  I still had some original Ford pieces that I had repainted.  The plasticized chrome portions were a bit scratched  but overall they looked OK.  They went on fairly easily and I was ready for the next pieces of trim in no time.

Next up was the narrow chrome strips that cover up the screws for the wide trim.  My old trim was pretty bent up so I had purchased new trim and mounting clips.  I was very careful to position the mounting clips so that the chrome strips lined up with the wide trim and the headlight buckets.  Unfortunately several of the new mounting clips broke during that process.  Luckily I was able to salvage enough used clips on the old trim I was discarding to make up for any that broke.  Other than the broken clips there were no issues installing this trim and I was now ready to move on to installing the grill.

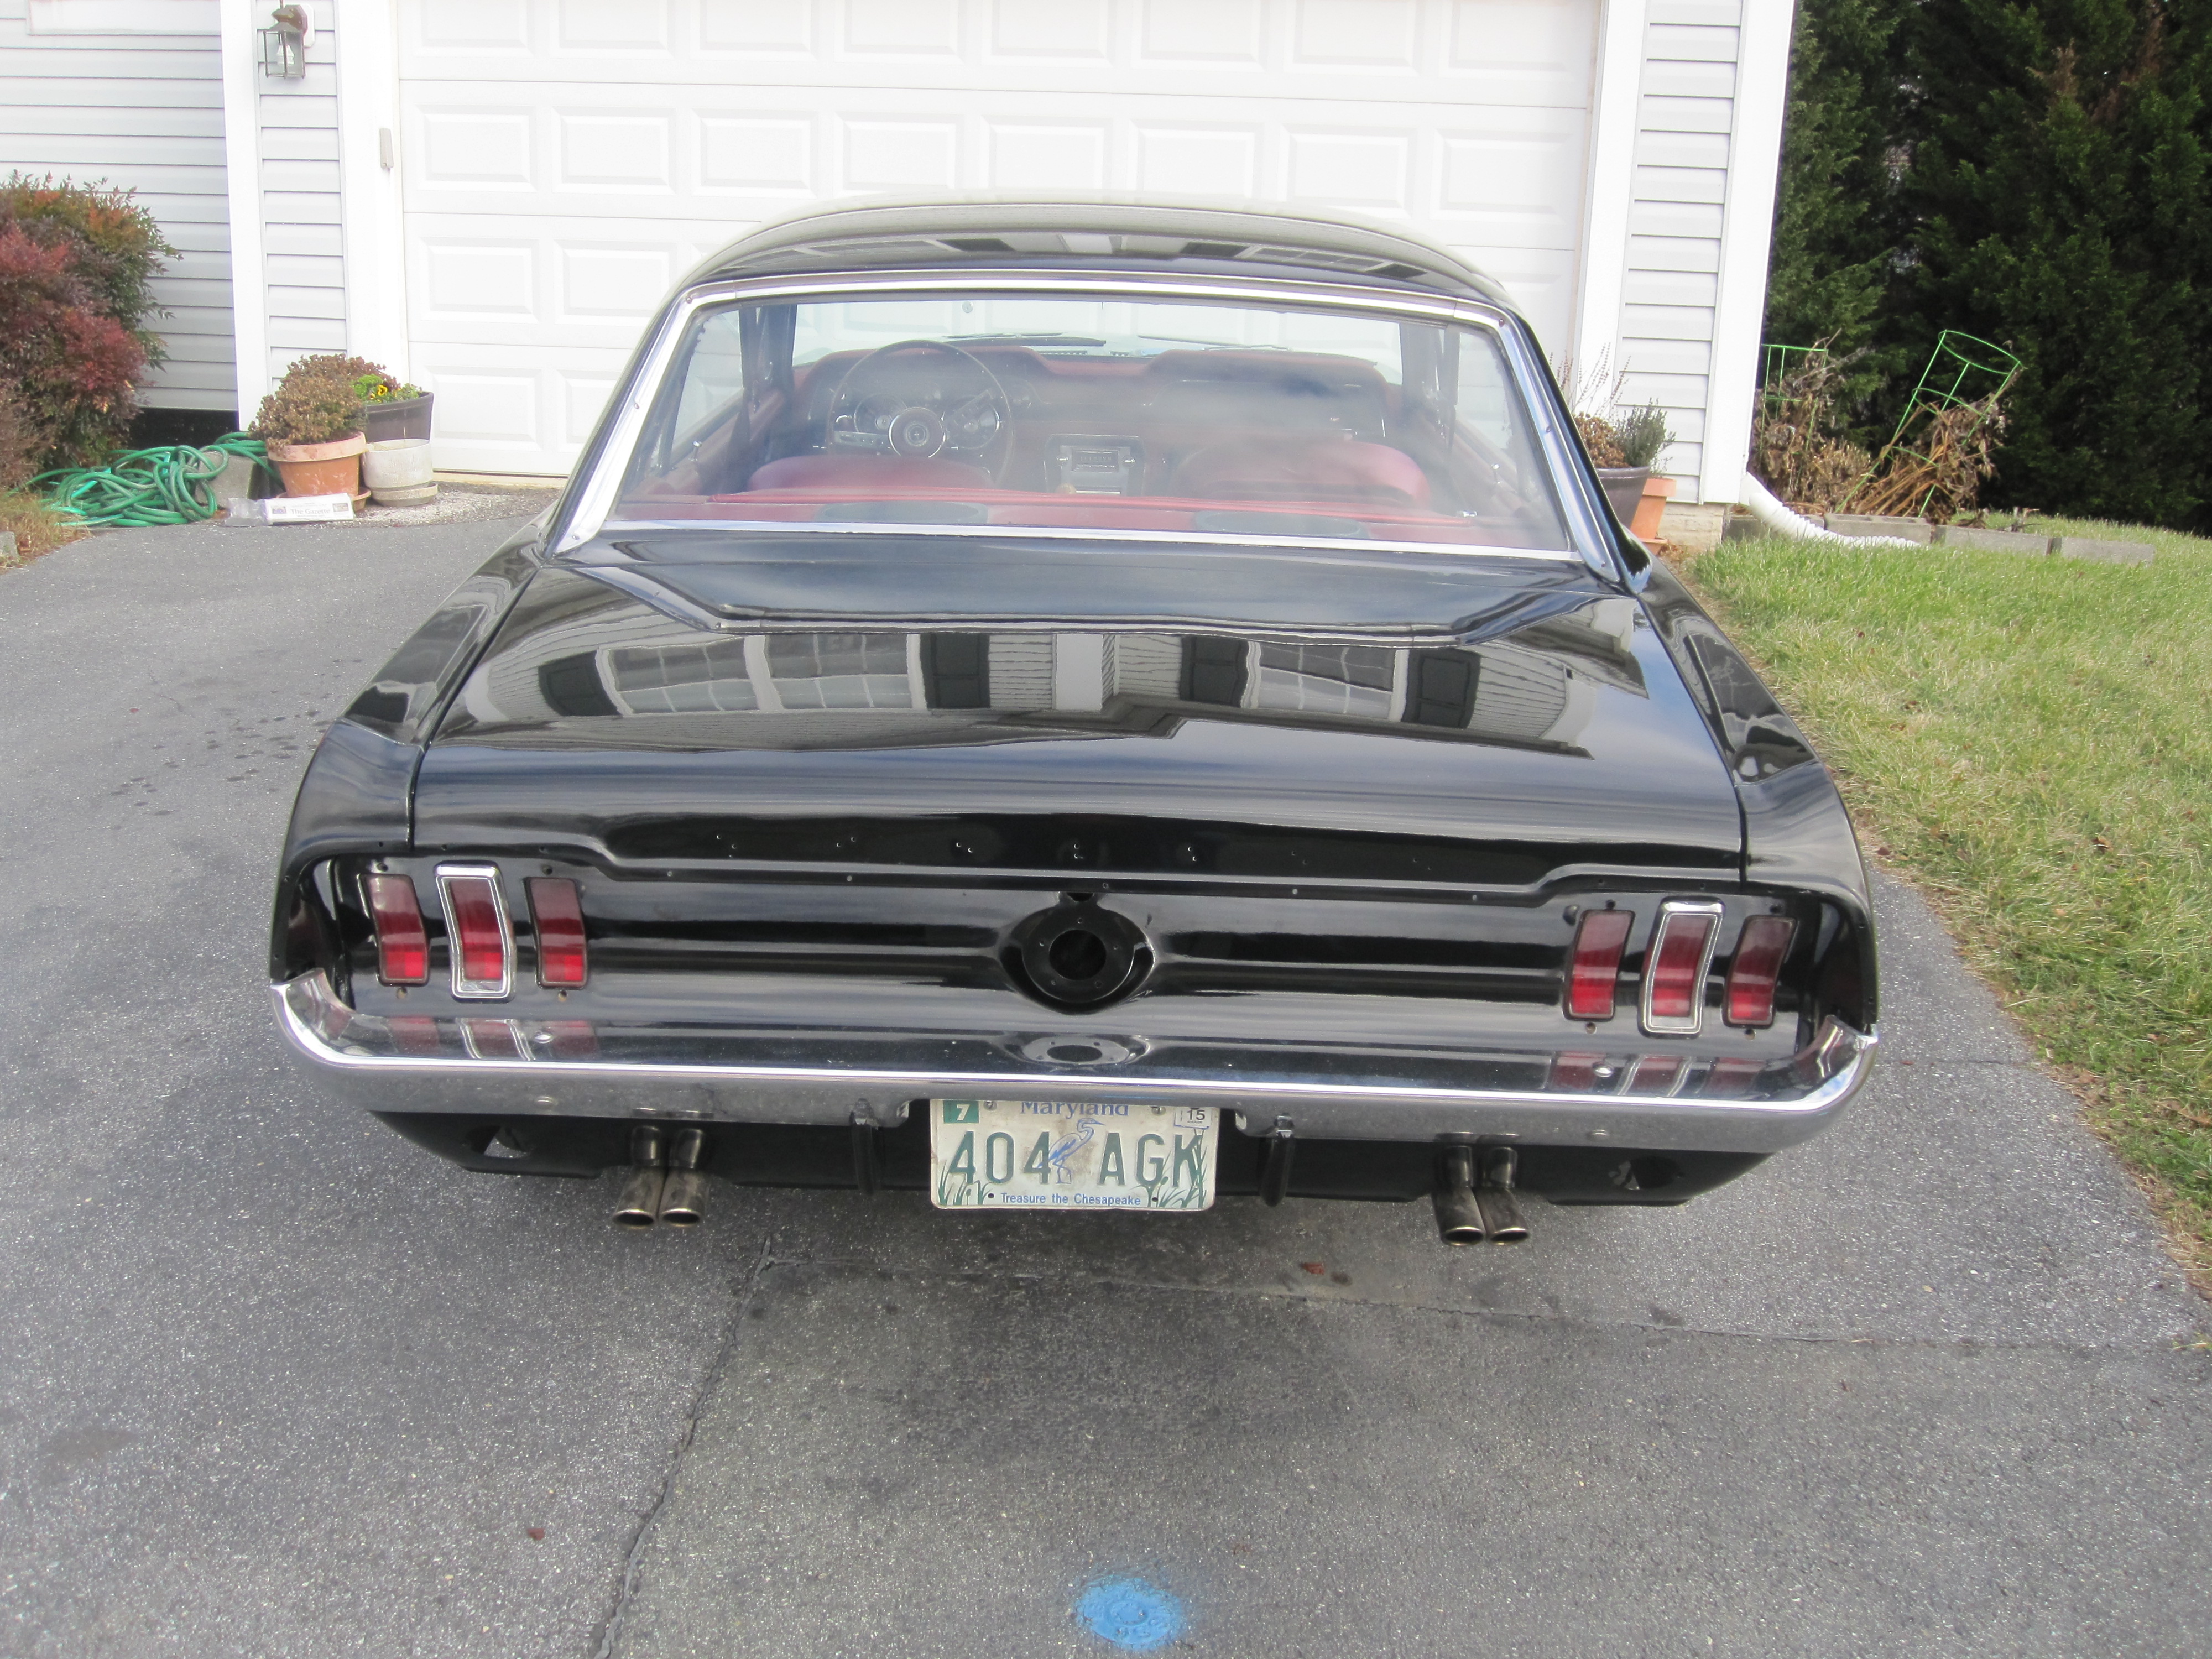
I took the old grill that I had repainted down off the shelf in my garage where it had been sitting for about 15 years or so  I brushed off the cobwebs and carefully dropped it down into place.  After that it was a simple job to bolt it into place.  The pony and corral and fog lights were the next parts to come down off the shelf.  They had even more dust and cobwebs on them but they looked OK for 47 year old parts.  I had installed fog light support brackets on the grill when I repainted it so the new fog lights bars slid right into place.  I bolted it all together and connected the wires. Then I stood back to admire my work.  I don’t have any pictures right now but as soon as I back the car up out of the garage I will take a few and post them here.

A quick test showed that the fog lights functioned perfectly.  I have to admit that I doubt they will provide much value as far as lighting goes.  They are more for show.  I just happen to like the way they look on the car, even though technically they aren’t correct for a non GT car.

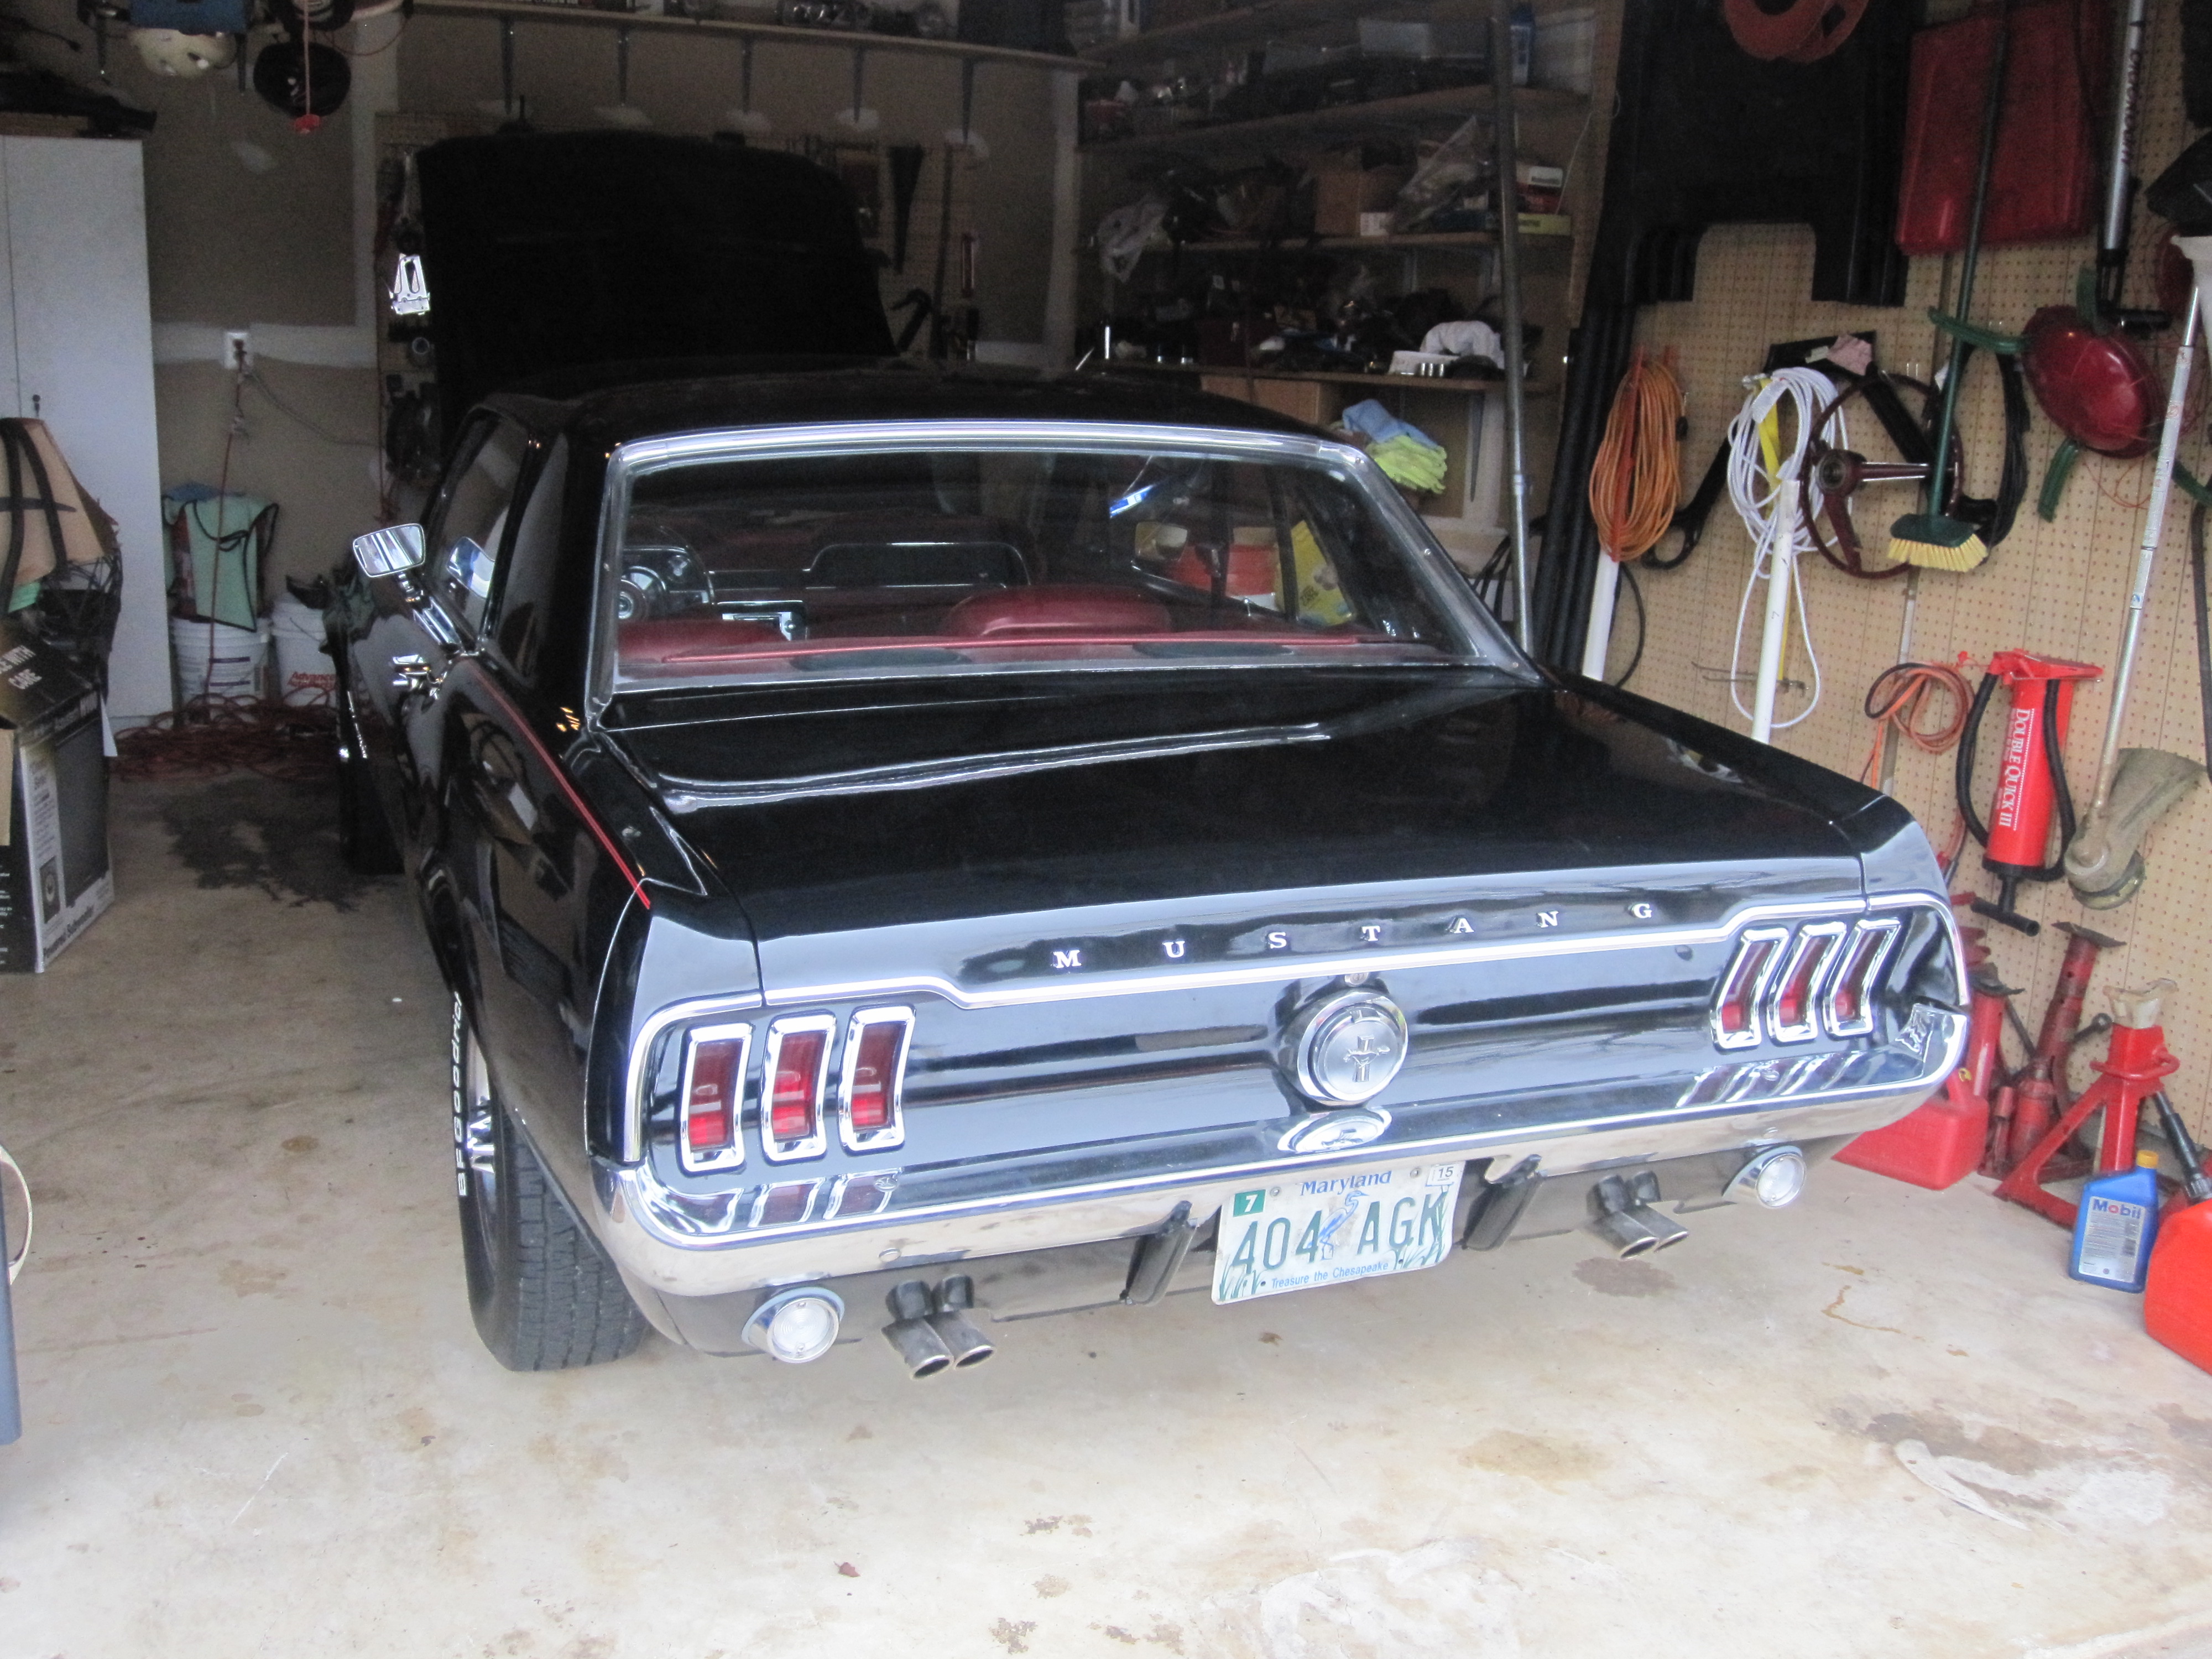
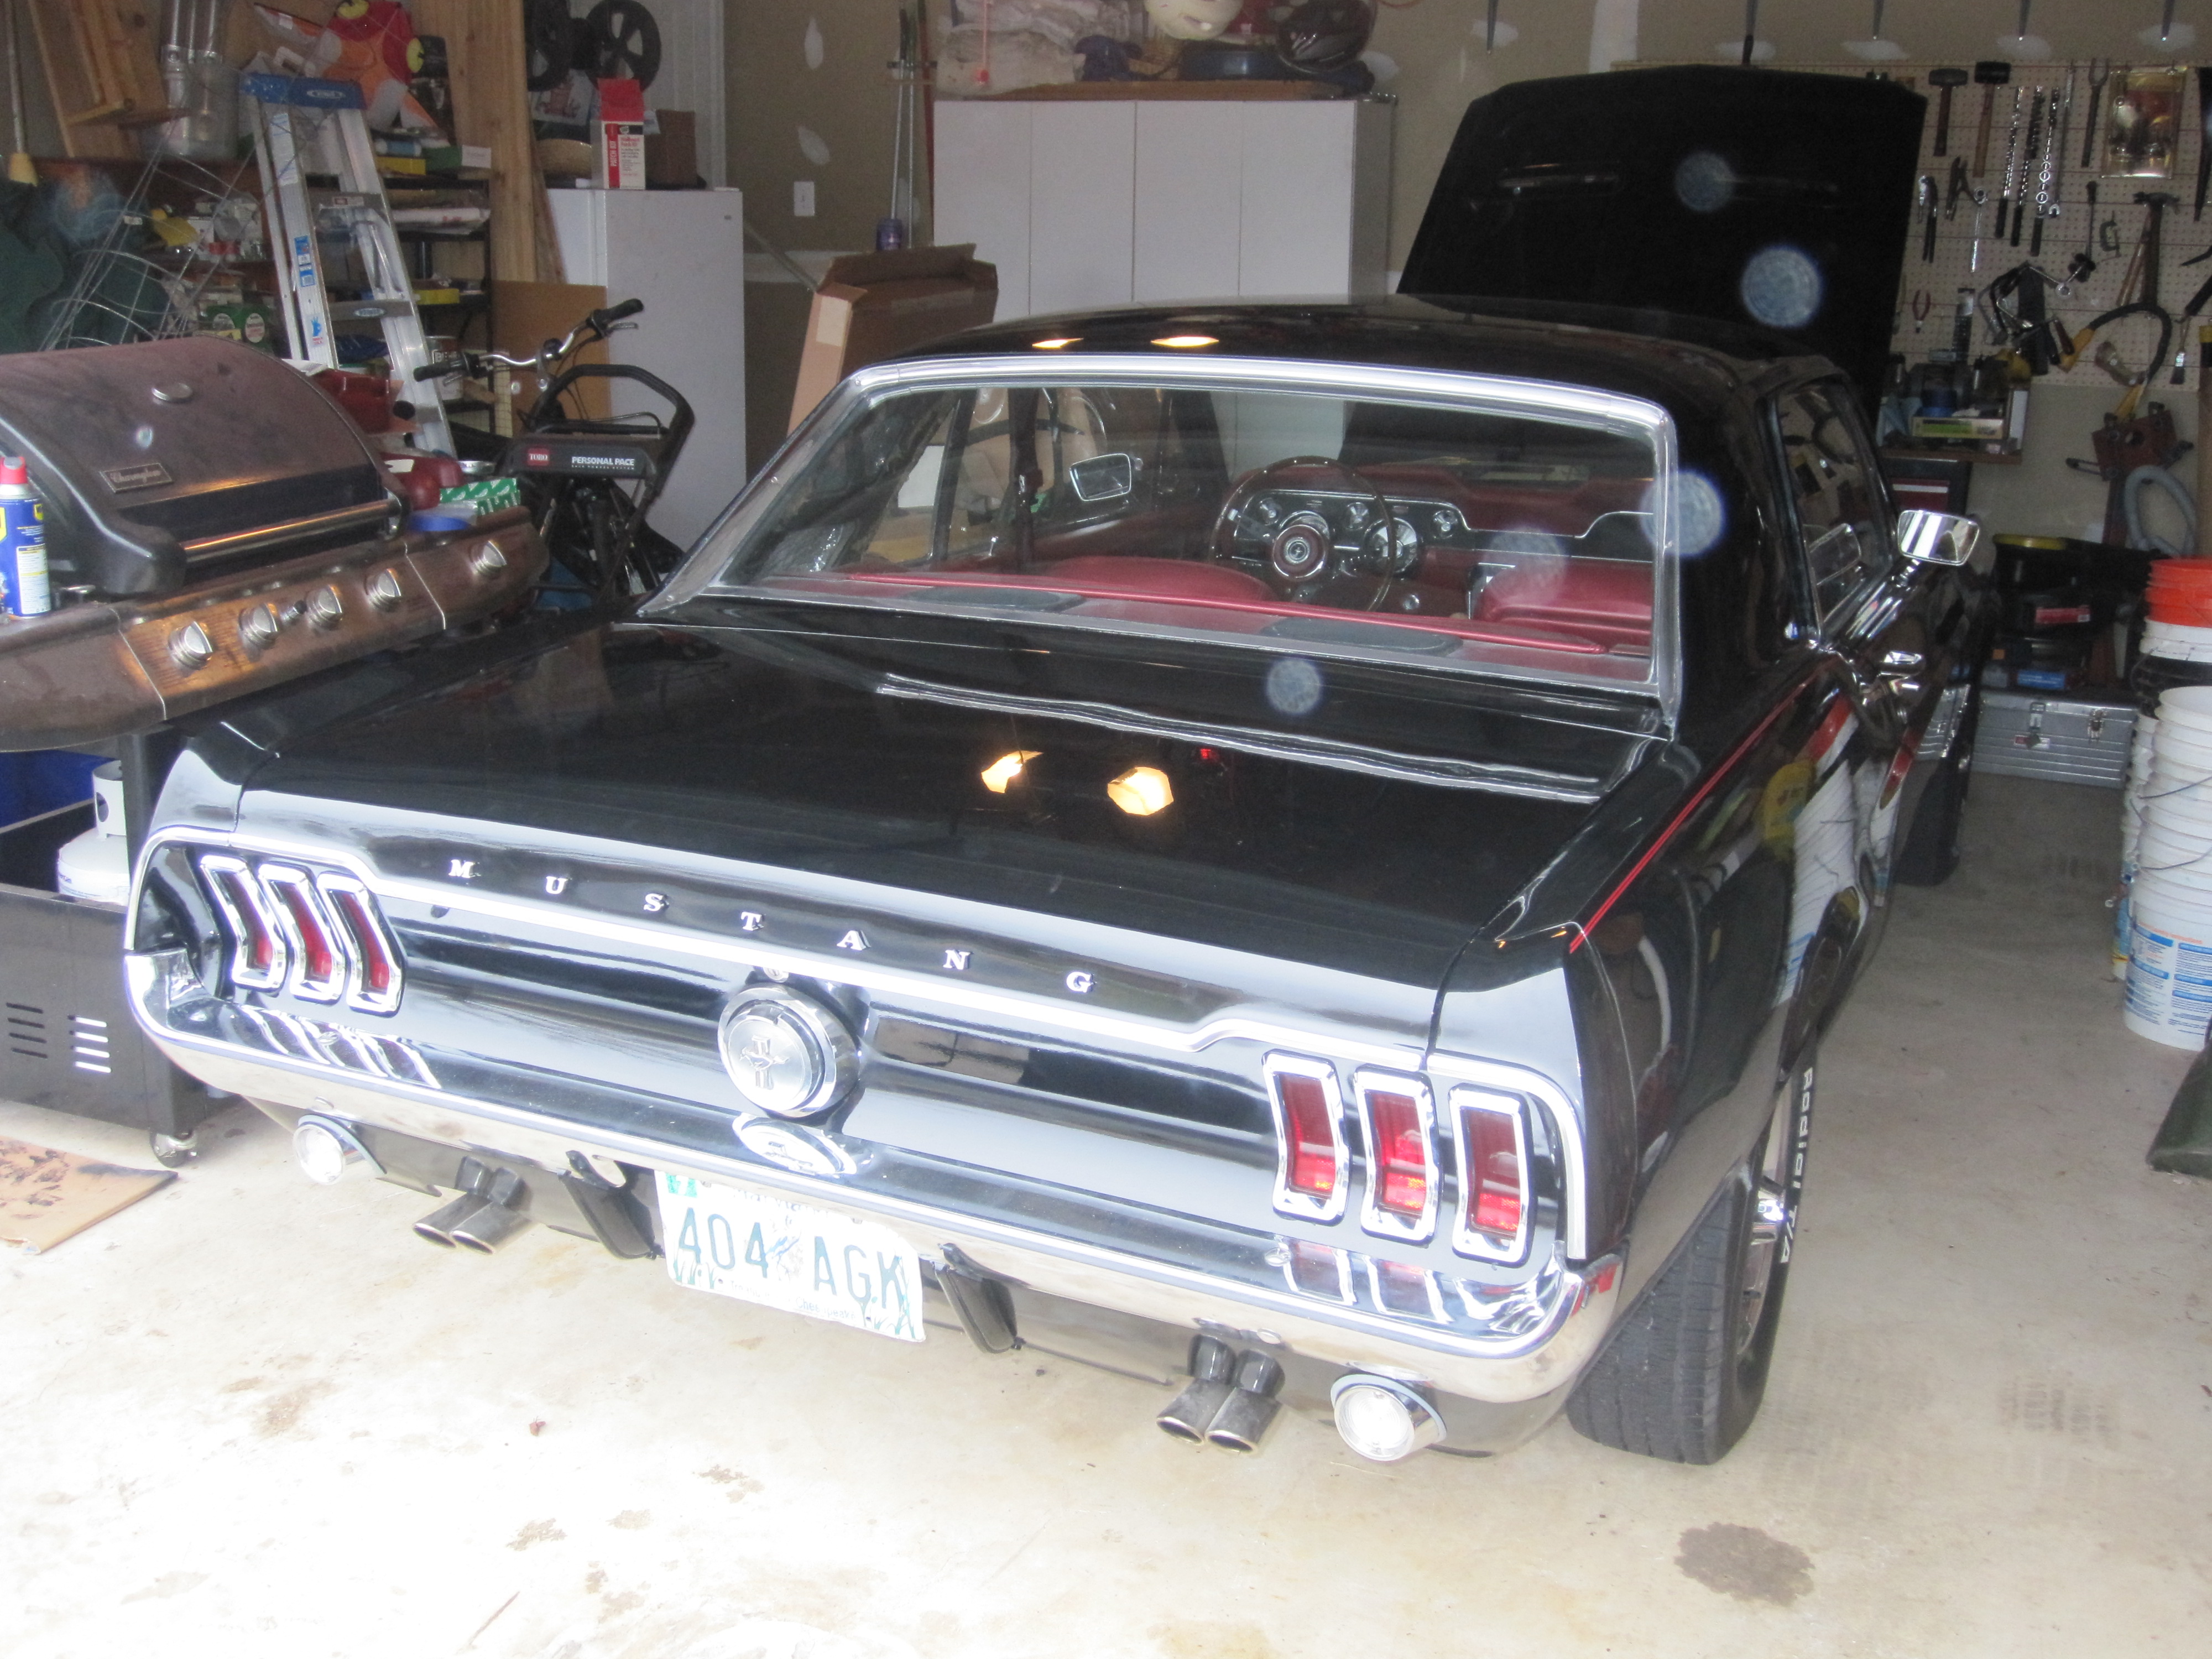
My last job of the day was to tackle the front bumper guards.  I had requested that Herbie install them when he painted the car, but he forgot to do so.  From talking to Herbie and from reading online it sounded like it was possible to install the bumper guards without removing the front bumper.  A quick survey under the car revealed that it was an extremely tight fit.  So I crawled underneath and spent what was probably the next 2 or 3 hours attempting to insert and tighten down 4 bolts, two per side.  Looking back on the job now I would have to say that it would have probably been faster to just remove the bumper for the install.  But I was able to finish the job without damaging the new paint job so I’m happy with the results.  A little hard work can be good for the soul sometimes.

Work will probably slow down or even stop for a while until either the weather begins to warm up or I obtain a heater for the garage.  But I’m sure I’ll find some Mustang related work to do inside my house.  And when I do I’ll post it here.


Rear Lighting

At 7:30 AM this morning I heard a package being delivered.  Could it be the tail light housing being delivered this early in the morning?  I went down stairs and opened the front door in anticipation of seeing a box of dried fruit or a fruit cake.  To my delight I instead found a package from the Mustang parts vendor.  Upon opening it I found the tail light housing I had ordered.  I was anxious to get to work installing it but it hadn’t warmed up outside yet and it was raining as well.  So of course that meant that I went out to the garage and got to work anyway.

The tail light housing was the first item I tackled.  I had new gaskets for it as well.  I polished up the original lens and it came out OK so I put the housing back together.  Then I placed the housing inside the trunk and inserted the new bezels to hold everything in place.  A set of new bulbs went in and I was then ready to test both lights out.  I flipped on the emergency flashers and walked around the car to check all the turn signal lights.  They all were working fine so I moved on to the next project.

Since I was working on lighting and was at the back of the car I chose to tackle the backup lights next.  I had new housings and attaching hardware all ready to go.  I had also installed new LED bulbs in the housings and tested them on my bench using a 12 volt power supply.  I learned that the bulbs were polarized and would only light up if they were inserted the correct way.  I’m glad I decided to test them before installing them on the car so that I could get the polarity correct and prevent me from chasing my own tail attempting to diagnose some non-working backup lights.

I found it a bit challenging getting the backup lights installed with the rear splash pan installed on the car.  There was very little room to maneuver around the rear leaf spring shackles and the exhaust tips.  I eventually decided to unbolt the ends of the splash pan to gain some additional clearance.  I was concerned that I might scratch or chip the paint but in the end everything went together OK.  A quick test of the backup lights showed that they both worked.

I was on a roll and didn’t want to stop just yet.  So I removed the rear bumper and rear quarter end caps so that I could install the end cap molding.  I had new hardware and gaskets for the end caps so I installed them as well.  The molding fit fine and everything went back together with no new scratches or paint chips.  I was careful to try and line everything back up the way it was when the paint and pin striped were applied.  I think it came out fairly well.  Here are a few pictures so that you can judge for yourself.  Try to ignore the dirty license plate and messy garage.  I’ll try to address both of those issues later.

IMG_1027 IMG_1028 IMG_1029

At this point I put away the tools and took a break.  I may take a shot at installing some of the weather stripping later today.  If not it may be as much as a week before I have an opportunity to continue working on this project.  I’ll just have to wait and see how things work out with family time over the holidays.  So until then…see you later.

Continuing Post Paint Assembly

It was a cold, foggy, rainy day today but I just really wanted to get some more work accomplished.  I decided to start out with something easy, installing the rubber bumpers under the trunk lid.  They popped right into place and the trunk lid closes a bit tight.  It looks like the lines for the rear chrome trim aren’t going to line up quite as nicely as I hoped.  I may have to do a bit of tweaking on the trunk lid alignment later on.

After the bump stops I moved on to the passenger door.  I installed the lock and door handle and checked to ensure that they both operated correctly.  I’ve done that job several times now so it is getting easier.  The best tip I can offer is to make sure you are wearing long sleeves so that you don’t scrape up your arms on the door.  I have an old sweatshirt that I wear just for these occasions.

The Scott Drake fender letters were next on my list.  I was a bit surprised to find that the inserts that press into the holes in the fenders and hold in the letters were made of metal.  All the ones I’ve used in the past were plastic.  I think I like the metal inserts better, although they can tear up your fingers a bit when you press them in.

I was running out of time since I started late and only had a couple of hours to work with.  For my last feat I installed the rubber bump stops that go in the fenders along the sides of the hood.  The new bump stops were all the same height, but I strongly recollect the originals as being two sizes, long in the back and short in the front.  I need to do a bit of research and possibly change the rear bump stops.  But for now the short ones will fit.

My new tail light housing should be arriving tomorrow afternoon.  The weather is predicted to be warmer, but it has a high probability of rain as well.  Hopefully I can squeeze in some more work tomorrow and at least get the tail lights installed and working.  If the weather permits I will also install the back up lights.  If so I can see how I like the new LED back up light bulbs I’m planning to install.

Until tomorrow.

Starting Trim Assembly

It wasn’t really all that warm or nice of a day today, but I couldn’t keep myself from starting the reassembly after paint.  I started at the back of the car because it was facing into the sun.  That at least gave me a little bit of warmth.  I felt that the most important things to address first were the trunk lock and fuel filler.  Without the trunk lock the only way to gain access to the trunk was using a long screwdriver.  After finding the new gasket in my parts inventory I made short work of the trunk lock.  The gasket made it a much tighter fit but perseverance and some pressure locked it into place.  The fuel filler was another easy job.  As a temporary install for painting I had it installed inside the gas tank with a spare gas cap.  I simply removed the filler neck, put on the gasket, and inserted it through the hole in the tail light panel.  A little WD-40 helped the neck slip inside of the rubber tank inlet hose.  Then I screwed on the pop-open gas cap.

My confidence was building so I decided to continue with the tail light bezels.  I had new gaskets and bezels ready, so I removed the left hand side housing and disassembled it for cleaning.  Most of it looked pretty good, but there was a bit of rust in the bottom where some water must have collected.  I scraped off the rust, reassembled the housing using the new gaskets, and then installed the housing and bezels.  Then I started on the passenger side.  It also had a bit of rust.  When I scraped it away I was left with a hole in the housing.  I had to leave that tail light for another day after I get a new housing, which is now on order.

At this point I was energized and didn’t want to stop just yet.  The trunk lid molding looked fairly easy to install.  It turned out it was a easy as it looked.  Then I put on the MUSTANG letter that go across the trunk lid.  They don’t line up quite as nicely as I would like.  The holes in the trunk lid were made by the factory so either the reproduction letters are a bit off or the assembly line worker didn’t make the holes quite straight.  That’s OK, it will be good enough for my purposes as I’m not building a show car.

The running horse fender emblems were next to go on.  It took quite a bit of force, but I was finally able to get them installed without breaking them.  I haven’t installed the MUSTANG fender letters yet, but i have them ready in my parts inventory. I also decided to install the hood mounted turn signals.  That was a really easy job, but I still need to check and make sure that they still work.

Next I turned my attention to the driver’s door.  I installed the rear view mirror, door lock, and door handle.  I made sure the lock worked and that the door opened correctly.  I wanted to start on the passenger door, but it was getting late and I had other things to do.  I compromised by installing the passenger side rear view mirror.  Then I stood back and admired my work.  One thing that stood out to me was that the rear view mirrors and door handles have been sitting in my garage since the late 1980’s.  They fit OK but I wonder whether newer reproduction parts would look or fit better.  That question will most likely go unanswered.

The weather forecast for next week includes a couple of warm days.  Hopefully I will find some time to continue the reassembly process in the next few days.

Paint Pickup

Yesterday I got the call from Herbie stating that he was finishing up my car.  He said he was doing some polishing and compounding of the car and that it would be ready for me to pick up the next day.  He gave me the price which I felt was very reasonable.  Herbie doesn’t do show car quality paint jobs although his work looks nice.  The price reflected that, which I was aware of and happy with.  I wanted a car I could drive rather than a show car that I could sit on a pedestal and worship.  I made plans and prepared for my trip to pick up the car.

Today I hopped on the subway and rode it into the city.  From there I rode a commuter train to the town where Herbie is located.  I had to walk the last 1.5 miles which wasn’t too bad.  I could use the exercise.  When I arrived I saw my car sitting in the driveway under an overhang.  I called for Herbie and we looked the car over.  He pulled it out into the sun so we could see better.

The car looked pretty nice.  I could see he had spent some time compounding and polishing.  If I looked close I could see some imperfections and blemishes, but the car really looks great from a foot or two away.  He added some red pin stripes along the body lines that are very similar to the optional accent stripes that Ford offered back in 1967.  Overall I was satisfied, so I paid Herbie and drove the car home.

Here are some pictures of how the car looked when I arrived home.  I still have a lot of work to do installing the trim and weather stripping.  The interior needs a really good cleaning too.  My Winter project awaits.

IMG_1014 IMG_1015 IMG_1016 IMG_1017 IMG_1018 IMG_1019 IMG_1020 IMG_1021

Musings on Headlights and Relays

My Mustang still has the original style sealed beam headlights.  They were never particularly bright, but I had learned to live with them.  For years the only alternatives seemed to be halogen sealed beam replacements.  I never bothered to upgrade in the past, but decided to see what my options are considering the improvements that have been made to lighting since the 1980’s.

The sealed beam halogen replacement bulb is still an option.  It is probably better than my pair of old sealed beams, but based on some of my research it may not be much better than a new pair of sealed beam units.  A really nice upgrade is to the newer H4 type of headlight.  This is the same as used on my 1997 Mustang.  I know that HID and LED conversions also exist, but the legality of these conversions is questionable.  I also would like a stock appearing unit, so the H4 conversion seemed to be the best choice.

To upgrade to an H4 bulb I needed to purchase some glass housings that bolt in the stock location and accept the newer H4 bulb.  I found a couple that I liked.  One was made by Hella and the other was Cibie/Valeo.  Some research on candlepower forums revealed that the Cibie unit was a better choice due to their light pattern.  Also for me I liked the look better as it was less flat than the Hella, although they both look fine.  I also looked at bulbs and settled on the Phillips X-Treme Vision based on their performance and that I got a really good price on them.  I went ahead and ordered the housing and bulbs and continued to plan.

One of the issues with upgrading the lighting on older Mustangs is in the headlight wiring harness itself.  The current for the headlights has to make its’ way to the headlight switch and dimmer switch in the car’s interior, then back to the headlights.  With old wiring and the length of the wiring, voltage drop can be introduced.  That’s one issue.  The current carrying capacity of the stock wiring is the second issue.  The newer and brighter headlights can sometimes require more current than the car’s wiring is designed to handle.  The headlight switch contains an auto-resetting thermal circuit breaker to protect the headlight circuit.  The increased current can trip the breaker causing the headlights to turn off.  Once the breaker has cooled off it turns the headlights back on until the breaker heats up again.  This causes a blinking affect where the headlights turn on and off when in use.  This is obviously not acceptable.

The cure for this problem is to use the existing factory headlight wiring as a low current switching circuit and adding a new circuit to handle the increased current.  This allows the existing switches to control the lighting the same as it always has, but provide more current carrying capacity for the headlights.  The higher current wiring will also be much shorter decreasing the voltage drop from the original wiring.  The way to accomplish all of this is to install headlight relays that are turned on and off by the existing wiring.  The high current is switched on and off by the relays.  I also chose to install higher current circuit breakers to protect the new wiring.  The original breaker in the headlight switch would provide the protection for the low current part of the wiring.

My next decision was how best to wire up the new higher current circuit.   I chose to go with overkill and install separate relays for each side of the car along with separate circuit breakers.  I have seen many instances where one pair of relays is used to power both lights.  Two relays are required because there is separate wiring for the low and high beams.  I wanted to isolate the two headlights from each other in case of a failure in one side of my new wiring.  Looking back on it now I think this may have been unnecessary but that’s my thinking and approach.

I planned to install a pair of relays and a circuit breaker in each of two project boxes and then wire them into the headlights.  I also planned to run 12 volts from the starter solenoid to power the circuit.  Getting the 12 volts was easy enough and so was filling the boxes.  The question now was where to insert this into the existing headlight harness.  I had seen three different approaches used.

The first approach was to splice into the existing harness and solder in new connections.  I didn’t really want to cut up my existing harness so I discarded this approach without any more consideration.  Looking back on it now it also had the disadvantage of reusing part of the existing wiring for the high current portion of the circuit.  I’ll explain more about why I think that is a problem in a minute.

The second approach was to purchase an upgrade wiring harness that used the existing headlight plugs to trigger the relays and used new ceramic headlight connectors and bigger gauge wiring.  This had the advantage of using the bigger gauge wiring for greater current carrying capacity along with the ceramic headlight connectors with greater heat tolerance.  I have heard that the original plastic headlight connectors can sometimes melt from the increased heat of the upgraded lighting.  So from a safety standpoint this sounded pretty good.  The downside is that it takes a bit of effort to remove if the stock look is required for shows.  Not too bad but the third approach I looked at was a lot more “plug and play”.

The third approach is to insert the new headlight boxes I was building in between the headlight wiring harness and the headlight extension wiring.  This would make it very simple to install and remove the relay wiring, as I only needed to separate one plug on each side of the car and insert my new wiring.  If I needed to remove it for any reason I could just unplug my relay box and plug the original wiring back together.  This looked like a great approach and I made plans to build everything this way.  But then I realized that the original headlight extensions used smaller gauge wiring and a plastic headlight connector.  I really felt it was important to have the heavier gauge wiring and ceramic connectors for safety.  So I returned to method number two.

I have almost all of the parts in hand but won’t be completing the project until my car is back from paint.  I can begin building the relay boxes and some of the wiring, but I need the car here so that I can take some measurements and find where I have room for the relay boxes and wiring.  This project isn’t a really high priority at this point, but just a “nice to have” item.  I’ll continue to work on it as time permits and will come back and post some photos when I get a chance.  Hopefully I’ll have the car back from paint in the next week or two.

Paint Drop Off

Time sure flew by really fast and the appointment for painting my car sneaked up on me.  I did make some time to remove the door locks, handles, and radio antenna.  I also drilled holes for and test fitted the moldings that go across my trunk lid and rear quarter end caps.  My skills at drilling holes in a perfectly straight line definitely could use some improvement, but I was able to enlarge and file everything so that it all fit OK.

I chose to drop off my car the night before the appointment based on the weather forecast.  It ended up raining earlier than predicted so I had to drive in a light rain.  That didn’t turn out to be an issue.  Since I had removed the outside rear view mirrors, lane changes were a bit challenging.  And without the door weather stripping the wind noise was pretty bad.  My family followed me in our minivan to give me a ride home.  They commented that my car’s exhaust smelled badly of gas until the car warmed up.  It sounds like I need to do some choke adjustments and carb tuning after I get the car back from paint.  I also noted that the car burned quite a bit of gas on the ride.  I drove about 75 miles and used about half a tank per the fuel gauge.  I don’t know how accurate the gauge is, but I would expect to be able to do a bit better than that.  It probably ties back in to the gas smell my family noted.

I’ll post updates as I receive them from the paint shop.  For now I just need to be patient and wait for the car to be completed.  I was told to expect it back in 2 or 3 weeks.  The date is contingent on how much body work is required after the car is stripped down to bare metal.  You just never know what is hidden under all the primer until you strip it all off.  Hopefully there won’t be any big surprises.  I will just have to wait and see.