Category Archives: Mustang

Getting It Running Again

The honey-do list got in the way of my working on the car over the weekend.  That meant I had to wait until the work week commenced before I could get back to the Mustang project.  After taking care of my Monday to do list that had developed over the weekend I had an hour or two to get back to work on the project.

First order of business was to install the starter.  When I parked the car 15 years ago the starter died.  I had pulled it and taken it to the local auto parts store for testing.  It had been completely seized so I purchased a rebuilt one.  That starter has sat on my garage shelf for the past 15 years.  I also had a new set of starter bolts squirreled away.  It took me a few minutes to locate the bolts, but I eventually found them and was ready to get going.

Now back in the old days replacing the starter meant that I was capable of sliding myself under the car to work on it.  No jack or jack stands used to be required for this job.  Years later I had gained more than enough weight to prevent me from fitting under the car as easily as I used to.  I got the car up on jack stands and slid myself underneath to have a look.  It was dark and cramped under there.  And moving my head to look around made me light headed and dizzy.  After a bit of wrestling and struggling I had the starter in place and two bolts holding it in.  There was a third bolt, but I needed more room and better lighting to get that one in.  I plan to install the last bolt after I get the car out of the garage.  I installed the cable that delivered battery power to the starter and crawled back out from underneath the car.

Next step was to change the oil.  I didn’t think it was a good idea to trust 15 year old motor oil even though it looked really clean.  I drained out the old oil and removed the old oil filter.  The rubber gasket from the old filter had become detached from the filter and was stuck to the oil filter adapter.  This was easily removed, but should serve as a reminder that this can happen. It was the first time for me, but there are plenty of stories out there of people who didn’t remove the old gasket and ended up with oil leaks.  One trick I like to use is to fill the oil filter with a quart of oil before installing it.  Since the oil filter adapter is at 90 degrees to the side of the block I can do this without spilling any oil.  I like to do this so that there is a second or so less where the oil filter is filling up and oil isn’t getting circulated throughout the engine.  It may be overkill, but on this car it is so easy to do that I feel it is worth it.  Finally I filled up the crankcase with oil and checked the level on the dipstick.  The dipstick said the crankcase was full.

The last step for today (I had very limited time) was to clean the ends of the battery cables and connect them to the battery.  I was a little hesitant to do this step as I wasn’t completely sure that the wiring hadn’t deteriorated over time or that rodents hadn’t chewed their way through some of the wiring.  Either one could lead to shorts that could even result in a fire.  Not something anybody wants to have happen.  But I was able to get the battery connected without any drama or smoke.  As a final check of my work I decided to try the starter to see if it worked or not.  15 years on the shelf is a long time.

Turning the key to the run position caused the instrument cluster to come to life.  I had gauges and red idiot lights where I expected to see them.  A great first step.Then I got brave and tapped the starter, only half expecting it to work.  But the engine spun around and the oil pressure light even went out after a few revolutions.  That was the good part.  The part that made me nervous was that the engine made a whining kind of noise I hadn’t heard before.  No clanks, rattles, or scraping sound. Just a very loud whine.  It made me nervous and I was at the point where I planned to stop for the day.  But now I need to figure out whether it was a result of a 15 year old starter, a bad starter installation, nothing i need to worry about, or something scary.  Time to contact some more knowledgeable people and see what their opinions are.

After consulting with Val we felt that the noise was he starter turning much faster than I was accustomed to since there were no spark plugs and hence no compression.  The starter was able to turn fast due to the lessened resistance of the motor.  When I put the spark plugs back in it should turn over the way I am accustomed to.  That wraps things up for the day however.  The next nice weather day when I have free time I expect to have the engine running again.

Working On My Own

Looking over the list of work to be done that I had made, there were a few things I could reasonably hope to accomplish in my garage or in my driveway.  If I was to work in the driveway I had to be careful not to tackle anything that would leave the car sitting there for more than a few hours at most.  I didn’t want to get in trouble with the HOA or anger any of my neighbors.  Val’s suggestion was that I concentrate first on getting the engine running again.  That seemed to make sense to me as it would make it easier to get the car into and out of the garage.  It also would be a huge boost towards getting the car back on the road since it would move farther away from being a roller and much closer to being a driver.  I felt that if the weather would just warm up a bit I could give it a shot.

I did some online research in starting engines that had sat for years and made up a list of steps to follow.  Then I emailed the list to Val to get his opinion.  He gave me a lot of good suggestions and really helped me refine the list.  He had told me during one of our past conversations that the formulation of motor oils had changed since the car was last on the road and that I needed to select an oil brand that contained enough of the additive ZDDP to properly lubricate my engine’s flat tappet camshaft and lifters.  Since one step of starting the engine was to change the oil I asked Val what he would recommend.  His recommendation agreed with what my online research had shown, which was to use Shell Rotella T 15W40 oil, which was available at Walmart for a fair price.  Here’s the list of steps I ended up with after talking to Val.  Don’t blame me if you follow these steps and they don’t work for you or you have a different way of proceeding.  I’m just sharing what I plan to do.

  • Drain any gas remaining in the fuel lines to the carburetor
  • Pull the spark plugs and inspect them.  Replace if necessary.
  • Repeat the following steps until the engine turns freely
    • Oil the cylinders with a small amount of ATF using a tube or fuel line to help guide the ATF into the cylinder
    • Wait for the ATF to penetrate
    • Turn the engine over by hand 90 to 180 degrees
  • Change the oil and filter
  • Carburetor may need rebuilding.  Make sure it is in good shape, especially if the air cleaner has been left off.  My air cleaner had been in place and the carburetor looked really good so I chose to wait until the fuel system had some pressure and see if it leaked or not.
  • Rig up a container of gas with a fuel line attached to the fuel pump inlet.  This was in place of my gas tank that I hadn’t installed yet.  If your gas and tank are OK this may not be necessary.
  • Turn the engine over using the starter until it has oil pressure or remove the distributor and prime the oil pump using an old distributor with the gear removed and a drill.  There is also a tool available for people who don’t have an old distributor available.  If cranking the engine with the starter this should also prime the fuel system.  Cranking the engine will also blow excess lubricant out of the spark plug holes preventing hydraulic lock in the cylinders.
  • If you used a tool to prime the oiling system, crank the engine over using the starter for the reasons mentioned above.
  • Replace the spark plugs
  • Have a fire extinguisher handy.  Safety comes first!
  • Prime the fuel system through the float bowl overflow if needed.  Shouldn’t be needed if you cranked the engine with the starter
  • Start engine – check for leaks, just let it idle when it is ready.  No need for high RPMs unless it is a new engine that isn’t broken in.
  • Set timing, adjust the carburetor, and check the dwell angle if the car uses points.

I watched the weather for the next few days and saw that the upcoming weekend was supposed to be a bit warmer.  I made the trip to Walmart to pick up the oil, oil filter, and ATF.  It turned out they also sell a hose that can screw on to a bottle of ATF and has a valve that opens and closes to control the amount of ATF that can flow through the tube.  I added that tool to my purchase, paid for the fluids and parts, and then headed home.

I decided that since I had some free time I would try and get the project started inside the garage before the weekend.  I pulled the fuel line and made sure it was empty.  Next I tackled the spark plugs.  There is very little clearance between the engine and shock tower on this car, so removing the spark plugs can be a challenge.  Combine this with the fact that there is very little lighting n my garage and you can probably imagine what a challenge removing the spark plugs can be.  But I persevered and eventually got them all out.  I also had some help from my one inch extension.  In a pinch I could always remove the valve covers as well to gain some additional clearance.

Now it was time to try out my new tool.  I opened the bottle of ATF and screwed the tool on.  Then I put the other end of the hose into each spark plug hole and put about one teaspoon full of ATF into each cylinder.  This was a little messy but not too much fluid was spilled.  Then I left it to sit for a couple of hours and let the ATF do it’s work.  When I came back I tried to turn the engine with a wrench on the crankshaft pulley.  It turned, but was a bit tight.  I put some more ATF in each cylinder and let it sit for a few minutes.  This time the engine turned much more easily.  I was happy and out of time, so I left it to sit until I could continue the job.  The plan was to continue the next day if time and my wife permitted.  If not, I would continue in two days, after the weekend was over .

Retirement and Resurrection

In January 2013 I retired from my job of many years.  I had several plans for what I would do during retirement, but one was to fix up my house by repairing many of the things that had been neglected over the years.  This led to some wall patching, painting, minor electrical, and plumbing work.  Eventually it reached a point where my wife and I couldn’t agree on some of the projects, so work ground to a halt.  A little while later I decided to shift gears and return to working on my old Mustang that had been sitting in the garage for the past 15 years or so.

I hadn’t been completely neglecting the car over all of those years.  I had been very slowly and quietly purchasing and squirreling away parts in preparation for the day when I could work on the car again.  I had some mechanical parts, some body trim, and the better part of the interior stashed away in my garage and basement.  A few of the parts were even NOS Ford parts that are no longer available.  But the majority of the interior parts are reproductions.

I knew the car required a lot of work after sitting so long.  I felt that the best thing for me to do was to join the local Mustang club and start looking for referrals from them on resources to work on my car.  I went ahead and joined the National Capitol Region Mustang Club, or NCRMC.  I had been a member of that particular club back around 1983 or so, but I had let my membership lapse as I was never very active and at the time a lot of the club activities seemed to be in Virginia.  I filled out an application and sent them the dues for one year.  Step one completed.

Looking over the club’s Web site and reading through their recent newsletters and forum postings I learned that one of their members not only worked on the cars but he also permitted the owner to work and learn along with him.  This sounded like exactly what I wanted.  I didn’t feel like I could work on the car at my house and was planning on farming a lot of the work out to a competent mechanic.  To have the opportunity to learn from somebody with a significant amount of experience sounded like the best of both worlds.  The mechanic’s name was Val and I gave him a call.

The phone conversation with Val went really well (at least in my opinion).  He was very knowledgeable and a really nice guy.  And even better, he was willing to help me get my car back on the road and ensure it was safe to drive.  The only catch was that he was booked up and couldn’t get to my car for about two months.  That was OK by me as it would give me an opportunity to inventory what parts I had purchased, what I had gotten back from the restoration shop, and what I still needed to purchase.

I went through all the parts I could locate and made a list.  I also made a list of what work I wanted to do, what order I planned to get it done, and what parts I needed.  This left me with a list of parts to purchase and the order I needed the parts in.  I scoured the Mustang parts vendors to find the best prices.  Then I started placing orders for some of the parts in batches.  What parts were included in a batch were pretty much dictated by when I needed them, what vendor carried them, and which vendor was having a sale.  I worked pretty hard at making sure I got the best prices by waiting for the vendors to have sales or discounts.  My parts collection was growing larger and larger.

There were still a few parts that were not available new and not being reproduced.  For those parts I remembered a used parts vendor, Dave at Pony Express that I had done business with before back in the 1980’s.  It turned out that he is still in business, although his location has changed.  I was able to pick up some interior trim panels from him, and I will most likely need some more parts from him as I go.  I also discovered that some parts that weren’t reproduced and had been hard to find used in decent condition were now being reproduced.  I made note of the parts and corresponding vendors so that I know where to find them when I need them.  Things really seemed to be coming together.

I waited patiently for the time to pass.  I also did some minor work on the car in preparation.  I bought a new battery as the old one was completely dead.  I cleaned up and polished some of the trim that was still on the car.  The tires were flat and when I tried to put air in them it quickly leaked out.  They were too badly dry rotted so I bought a set of tires online.  I had them shipped to the local tire store.  Then I put on end of the car on jack stands, took off the wheels, took them to the store to have the tires mounted and balanced, and then put the wheels and new tires back on the car.  Lather, rinse, and repeat for the other end of the car.

Then I got ambitious and drained the gas tank of the extremely bad smelling liquid that was in the tank.  It used to be gas, but it wasn’t anymore.  This took a couple of trips to the hazardous waste disposal site. Then I removed the tank and took that to the disposal site as well.  I ordered a new tank and all of the hardware and caulk needed to install the tank.  While cleaning out the lip where the tank mounted I crawled under the car and noticed that both of the mufflers had rusted through.  Then I saw that part of the tail pipes weer rusted through as well.  That meant I needed to include a new exhaust system in my list of parts to replace.  I looked around some more underneath and noticed that the driver’s side trunk drop off was pretty rusted as well.  I let Val know and he recommended that I not install the new tank as repairing the rust and replacing the exhaust would be easier with the tank removed.  That put the new gas tank installation on hold.  I put the new tank in place but didn’t bolt it in permanently.

Finally it was time to check in with Val.  He said that he needed more time for the car he was working on and would let me know when he could get my car in.  I went off and ordered a few more parts as a consolation.  Periodically I would check in with Val and each time he said that he was still working on the same car.  Finally, four months after I had first contacted him he said he was ready for my car and would come out with a trailer to pick it up.  Mother Nature decided to intervene at this point and unleashed with some snow.  So we had to delay once again.  It seemed like every time Val planned to come by to pick up the car the weather interfered.  Then Val let me know that he had a standing obligation to do some charity work every year in the Spring.  Everything had been delayed so much that he was now under the gun to get that work done, and the dates couldn’t move.  So my car would be delayed once again for about another 6 weeks or so.

At this point Val’s best recommendation was to either just wait for him to fit me into his schedule, or to start some of the work on my own and get back with him in 6-8 weeks.  I wasn’t really too sure what I could reasonably hope to accomplish with my limited facilities and HOA restrictions.  But I agreed that this was the course of action that made the most sense.  I went back through my list of labor to be done and separated out what I might be able to accomplish on my own.

Grinding To A Halt

I continued to drive the car in this condition for a few more years.  There were a few repairs here and there.  The interior and paint began to both deteriorate from usage and exposure to the environment.  I started planning for another “restoration” process.  This time I planned to restore the car to fairly close to stock condition.  I brought the car to a restoration shop known for doing quality work, but they turned me away.  I gave it some more thought and decided to not do a full restoration, but that I would rework the areas I was capable of doing myself and hire a shop to do the bodywork and paint.  I began collecting a few parts here and there when the parts vendors had them on sale.  My next great idea turned out to be my downfall.

I wanted to have the original engine rebuilt and returned to factory stock.  I searched for a local shop to handle the job and found one that had a good reputation and sounded excited about doing the work.  They stopped by my house and picked up the engine.  I spoke with the owner after the engine had been disassembled and I thought I could expect to have the engine back in a few weeks to a month.  That meant it was time for me to get busy.  I had purposely had two engines to minimize my down time.  So I yanked the high performance engine out of the car and contacted a local body shop to strip and repaint the engine compartment.  Once that was done I had the car towed to my parent’s driveway in preparation for installing my newly rebuilt engine.  I stayed in touch with the machine shop and spoke with them at least once per week.  There was always some kind of hold up. Other jobs ahead of me.  Waiting for parts.  As a consolation they permitted me to use their glass bead cabinet to clean up some of my old parts.  This dragged on for, believe it or not, about 5 or 6 years.

When I first contracted to have the engine rebuilt I was dating a woman who really had no interest in cars.  We got engaged to be married, but she requested that I be done with fixing up the car prior to the wedding.  Unfortunately the engine wasn’t completed until long after the wedding date.  So that caused a big problem, effectively halting the project.  So now I had a roller sitting in my parent’s driveway, a collection of parts at my house, and a newly rebuilt engine.  I eventually bargained for some time and money and got the engine installed.  I also installed a bunch of the parts I had been collecting.  This included the metal brake and fuel lines, the braking system, the front suspension, the clutch, and the steering.  So mechanically the car was in pretty good shape.  The bad news was that after sitting outside so long the front cowl and floorboards had rusted through.  Rust was also starting to show on the doors and tail light panel.  A couple of steps forward and one big step back.

I knew I didn’t have the skills to fix the rust, and I didn’t want to trust the work to just any body shop considering all the problems I have had in the past.  What I eventually learned was that the parts shop I had spent so much money at had expanded and now did paint and body work.  I called them up and made an appointment to have my car worked on.  While they were working on the front cowl and floor pans they went over any other rust they found on the body.  They also permitted me to start the engine and break it in while the car was in their shop.  They also fixed a few mechanical issues that they found.  Then it came time for paint.

I don’t know what changed, but all of a sudden the whole situation became adversarial.  I spoke with the owner and he said “You don’t want us to paint your car”.  He repeated this to me several times even though I told him that I did want the car painted.  At that point he threatened to place a mechanic’s lien on the car and take it from me.  When I asked him what the basis was for him taking the car, and that he hadn’t even given me a bill yet and i had paid a sizable deposit, so he couldn’t say I wasn’t going to pay for the work.  He then tried to say it was because I wasn’t communicating with the shop and had just left my car there.  I then pointed out that I had a detailed log of every conversation I had held with him, and that I had called them at least once per week, and usually several times.  At that point he backed off and said they would not paint my car and that they would get it ready for me to take home.

When I came back to pick up the car the entire interior was still disassembled.  All the exterior chrome trim was removed, The car had no bumpers.  The fuel filler neck was inside the trunk with a rag stuffed in it.  The engine air cleaner was missing.  And when I started the car the charging system didn’t work.  When I pointed these issues out I was told that they had prepared the car for paint and there was no point in reassembling the car.  That put me in the position of having to have the car towed back home.  They agreed to make the car drivable.  The next weekend I returned, paid the bill, let them load the car with the boxes of parts they had taken off, and drove away.  When I got home I discovered that several parts were missing, the air cleaner they gave me was not the one on the car when I brought it in, and most of the fasteners for the parts they did return were missing.  The speedometer had stopped working half way home.  It turned out they had removed the instrument cluster and not tightened down the speedometer cable when they replaced it.  I called the shop back the next day and got apologies and was told they would ship me the missing parts.  I never received the parts and the shop eventually went out of business.  Shortly after that my wife and I purchased a new house with a two car garage.  The car was parked in the garage and didn’t see the light of day for the next 15 years.  Hopefully that will change in the near future as I am now retired and have the urge to start working on the old car again.

This and the previous posts were an attempt to sum up 40 years of owning the car.  Obviously a lot of details were left out, either because they weren’t that interesting or I couldn’t remember them.  Most of my old friends no longer have their muscle cars.  I rarely see any of those people anymore either.  We all grew up, started our own separate lives, and grew apart.

I have been planning to start working on the old car once again.  This blog was originally intended to document that process, but I couldn’t resist telling some of the history of this car and remembering some of my friend’s old cars.  I do still have several challenges to getting the car running again.  I live in a neighborhood with covenants that prohibit working on cars.  I’m missing many of the fasteners and a number of the interior parts.  The engine hasn’t been started in 15 years and the gasoline in the fuel tank has turned into some new organic compound with no resemblance to gasoline.  Sitting in the garage has caused the tires to dry rot and go flat.  The exhaust system has rusted through.  And there is some new rust developing.  So I do have my work cut out for me.  I’ll write some new posts as the work progresses.

Hi Performance Engine

At this point I was happy driving the car around as it was.  I was enjoying the car but there wasn’t anything really significant to discuss.  So we need to fast forward the story several years. But before I get back to my car, I have another friend’s car to mention.

My friend Jimmy had always wanted a 69 Charger.  For anybody not familiar with a 69 Charger, it is the car that was the star of the old Dukes of Hazzard TV series.  Jimmy wanted one of those cars, but not painted to look like the TV car.  I remember searching through the want ads at his house trying to help him find a car for him to fix up. He eventually found one and bought it.  Since he was employed at a Dodge dealership, he had access to parts, equipment, and people with the knowledge of those cars.  He had a 440 engine built for it along with an A727 automatic transmission.  He put in 3.91 gears, had the interior redone, and painted the car red.  I think it looked better than a Dukes of Hazzard car could.  Here’s a picture of Jimmy’s car.  As far as I know he still has it.  Maybe more to come on that in another blog post once I get back to work on my car.

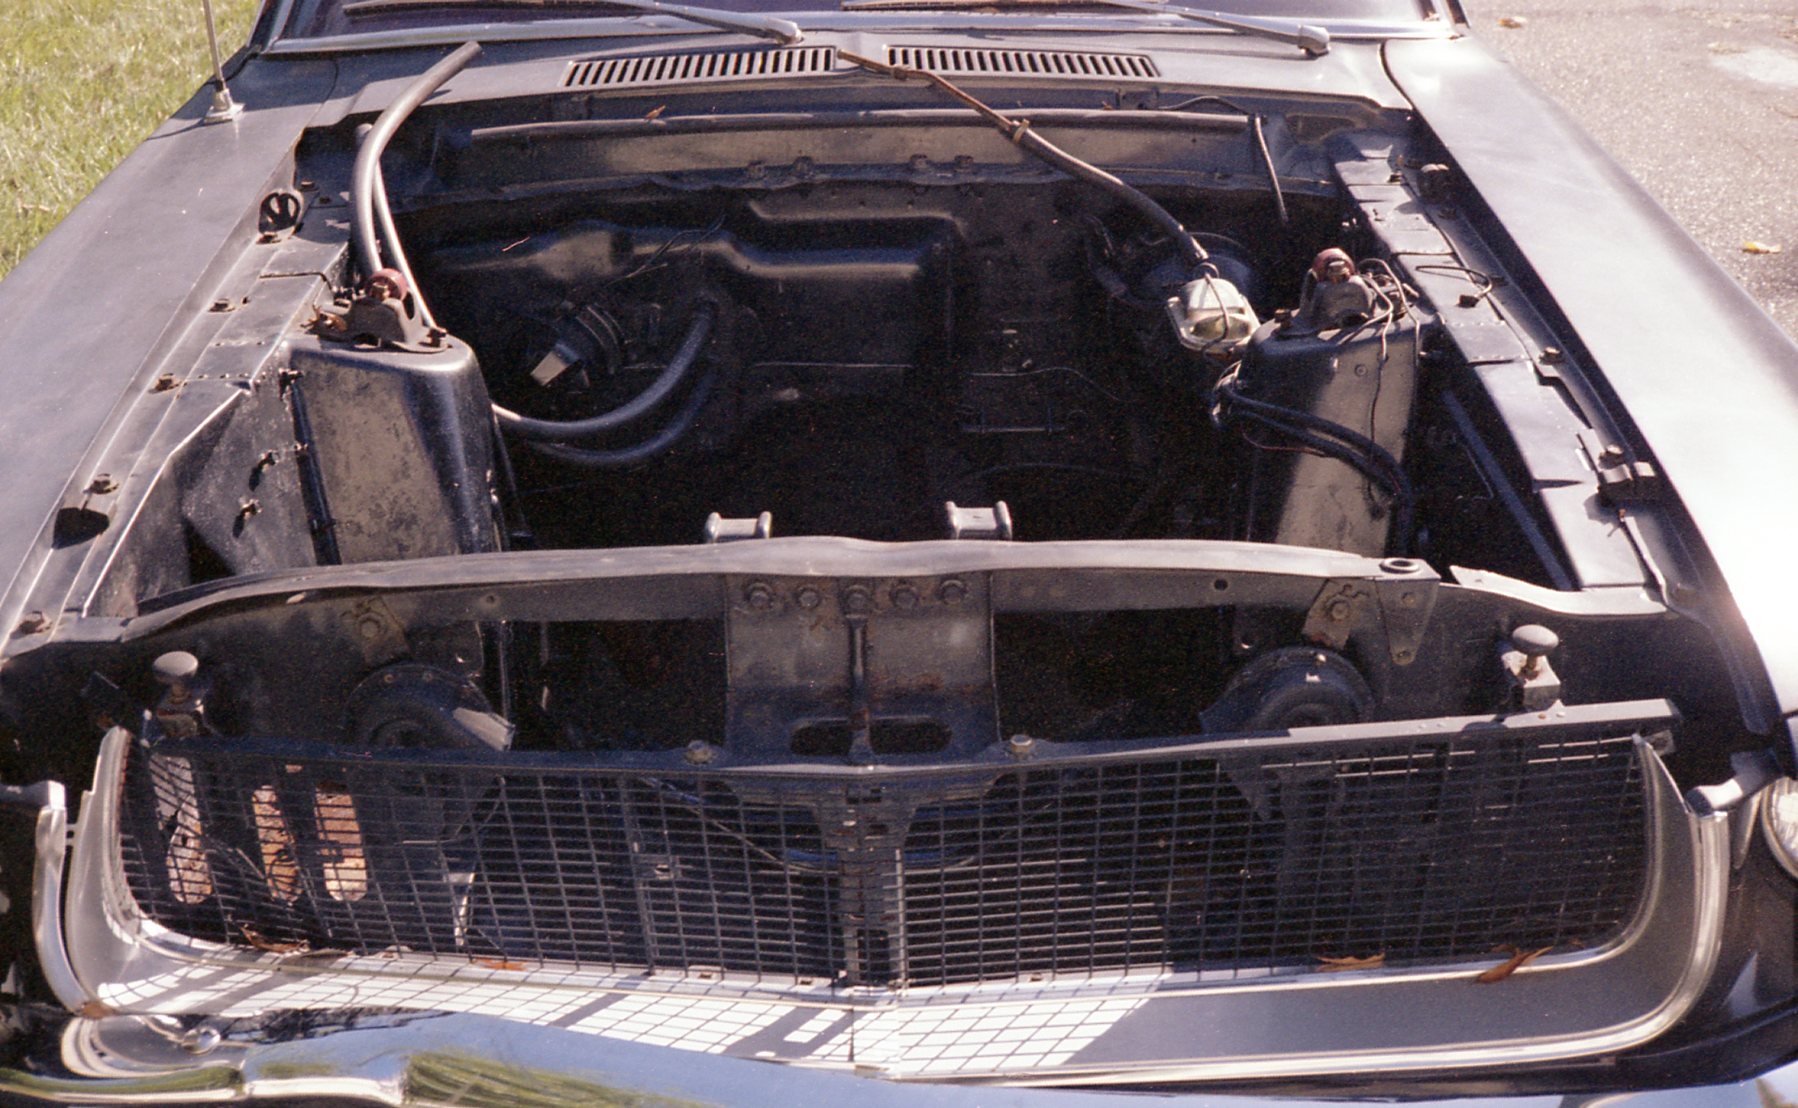
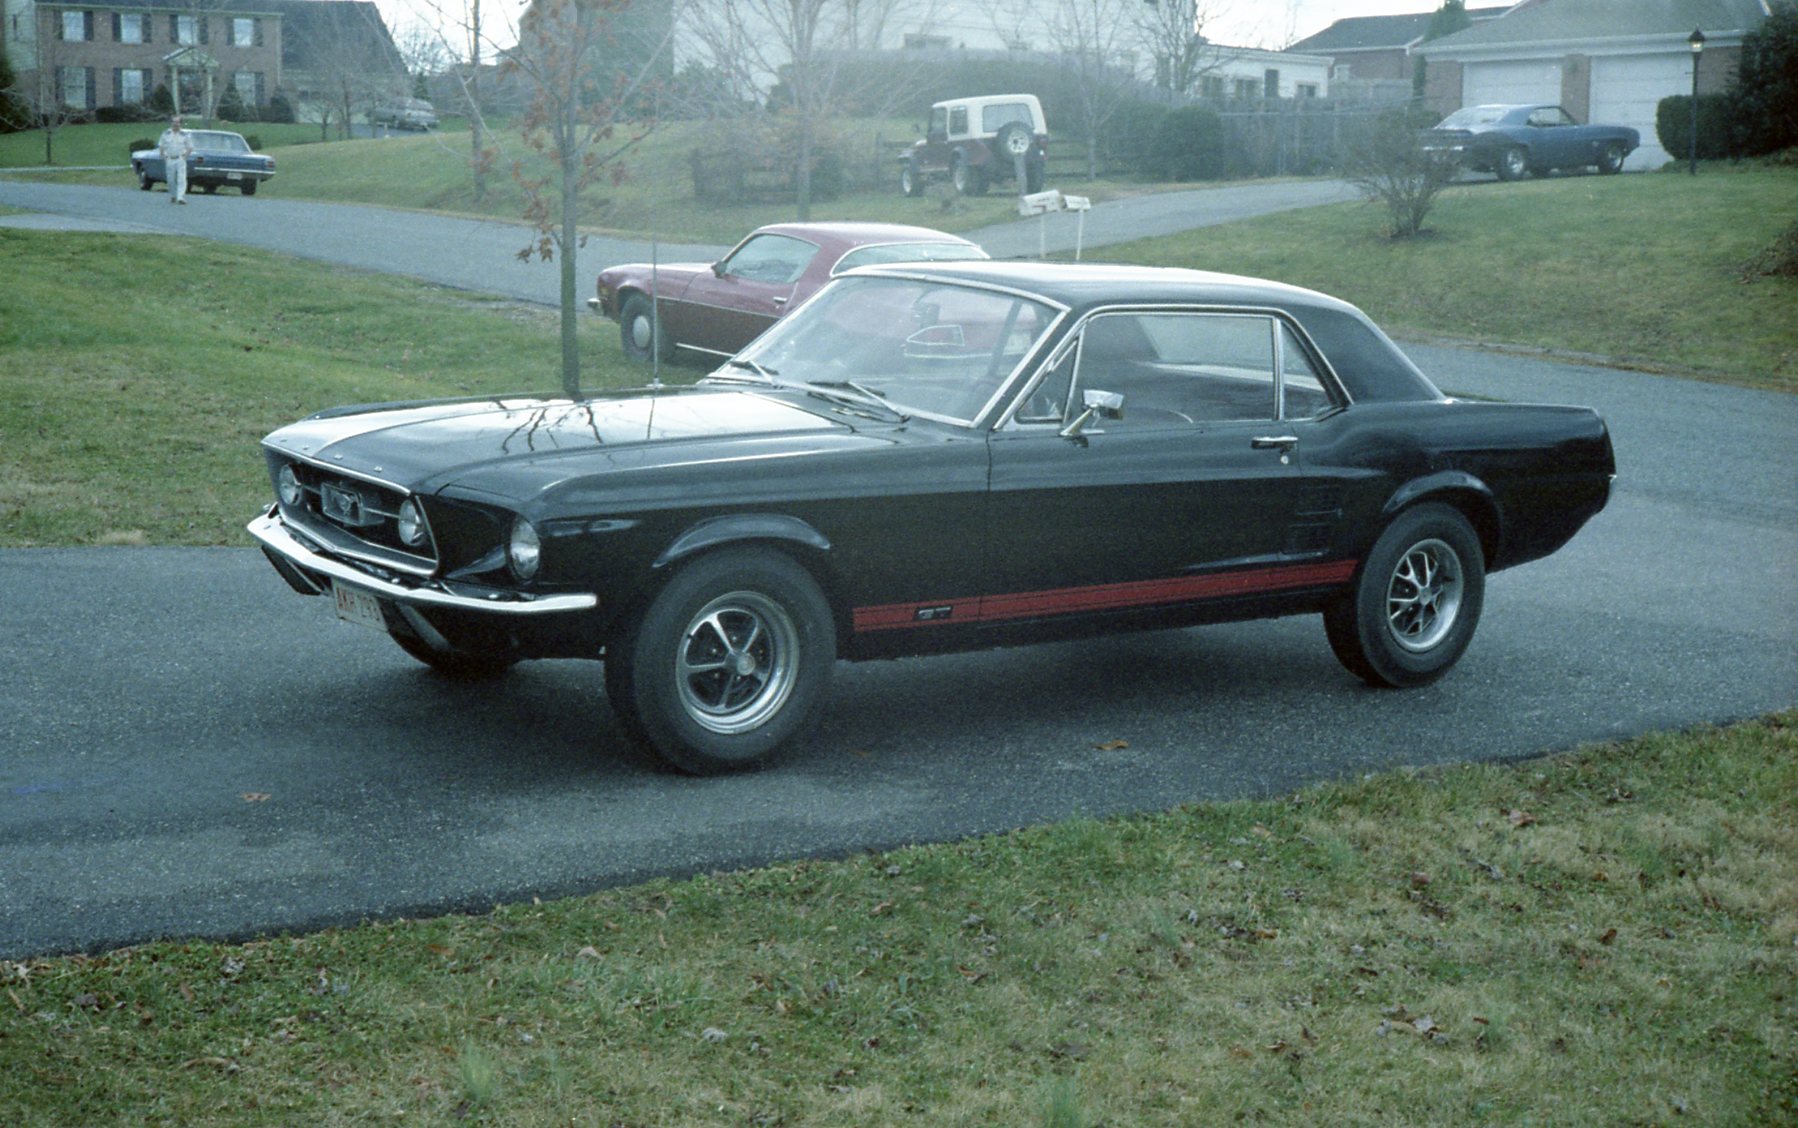
One evening on my way over to Jimmy’s house I was involved in a minor accident.  Some damage to the front bumper, grille, and hood.  Nothing that couldn’t be fixed, but it was fairly upsetting at the time.  Here’s a picture after the accident showing some of the damage.

img694

One thing you might notice is that there is no engine or transmission in the car.  That’s because I had already been planning an engine upgrade before the accident occurred.  I had a 428 crank, Mercury 410 pistons, 428 CJ heads, and an old tri-deuce intake manifold and carburetors.  I was building what today would be called a stroker motor.  The 428 crank combined with a 390 bore resulted in 410 cubic inches.  The 428 CJ heads flowed a bit better then the 390 GT heads I had been running.  I had the machine work done on the parts at a local machine shop.  Then I bought a clutch and flywheel and had the engine balanced.  After that I assembled the whole thing in my parents garage.  Here’s a couple of pictures taken just prior to installing the engine in the car.


img702 img695

Unfortunately just after I had everything installed but before I had even been able to start the car the intake and parts of the valvetrain were stolen off of the car.  This happened on a week day while I was at work.  Nobody was ever charged with the theft, but I have an idea who did it.  I ended up getting very little from the insurance company, and spending a lot to replace the parts.  Unfortunately the replacement manifold didn’t fit very well and leaked oil from the back of the intake.  This contaminated the clutch enough that it never really ran as well as I would have liked.  It was still a lot of fun seeing the looks on people’s faces when I opened the hood.


Interior Work

Once the bodywork and paint had been completed, it was time to turn my attention to the interior, which wasn’t really bad, but needed quite a bit of help. The front seats had ripped along the seams. The back seat had a cigarette hole burned into it. The carpet was pretty well worn. The dash pad was warped from the sun. And the plastic “chrome” had peeled off of the dash. And the steering wheel was an aftermarket wheel that never fit correctly. After a lot more trips to Pony and Corral and Mustang Magic I was ready to start work on the interior.

I had never done any kind of upholstery work before.  But my mom has always been very handy at activities like sewing, knitting, and crocheting.  She said that if I was able to get ready made seat covers she would be able to help me install them.  Luckily several Mustang parts vendors carry the seat covers so I ordered a full set which includes the front buckets and rear seat.  I also learned that installation of teh seat covers required the use of hog rings and hog ring pliers.  A local automotive upholstery shop gave me a handful of hog rings, and my friend Jim ordered the pliers from the local Mac tools salesperson.  In order to remove the old seat covers I first had to disassemble the seats (after removing them from the car).  This was the easiest part of the project.  Then I had to cut out the old hog rings using side cutting pliers.  This required a fair amount of physical strength and I eventually ended up breaking the pliers by the time I had completed the last seat.  Nowadays the Mustang parts vendors sell a pair of pliers that cut the hog rings much more easily.  I wish I had a pair of those pliers back then.

In case anybody wants to know what hog rings look like, here’s a picture of the rings, hog ring pliers, and the cutting tool I mentioned.

Product DetailsProduct Detailshttps://d2zl5tj7gmc4tr.cloudfront.net/images/products/918-1_20190510090553.jpg

Once the old seat covers were removed, we transferred the listing wire from the old seat covers over to the new seat covers.  I was later told that I could have cut off the old seat covers with a razor blade or scissors, leaving the old listing wires in place.  Then I could have made a new wires out of coat hangars and hog ringed them to the old listing wires.  Whether I reused the old listing wires or made new ones, the next step was to stretch the seat covers over the seats and attach then using the hog rings.  This step required a whole lot of stretching and pulling to ensure the seat covers were aligned correctly and that there were no wrinkles.  Here was where we employed a combination of my mom’s experience and my strength.  The finished product came out pretty well.

While the interior was stripped out of the car I took advantage of the opportunity to repaint the doors, dash, and interior trim panels. Once again the Mustang parts vendors supplied me with the correct color paint in spray cans.  I used a wire wheel in a drill to strip the old paint.  I was afraid of using paint remover, although that would have worked well in combination with the wire wheel.  There was dent in the glove compartment door, so I patched that with some body putty.  Then I sprayed on the paint.  Most of it came out fairly decent, but a few areas could have used more surface prep.  Still I was happy enough with the result.  I wasn’t building a show car, just trying to make my daily driver look nice.

One of the upgrades I planed to do at this point was to install an instrument cluster with a factory tachometer.  This required a bit of rewiring to make it work. I had a shop manual but it didn’t show the differences between the standard cluster and the tachometer cluster.  I did eventually find the correct wiring in a Chilton’s manual I had.  The differences were fairly minor and I was able to make the changes without much difficulty.  Interestingly enough, all the Mustang parts vendors and repair shops who saw the car after I had made the change said it couldn’t be done or that what I had done would never work.  Sometime this was even after I had been running it that way for 10 or more years.  Apparently automotive wiring is a mystery or black art to some people.  I did make one mistake that I shouldn’t have.  I needed to run a wire to the alternator, but didn’t have a handy opening in the firewall.  So I snaked the wire through a small hole I made in the grommet for the clutch linkage.  If the wire had ever shorted out on the firewall I could have had one serious fire.  I was lucky and that never happened.  But ti was a rookie move on my part that I should never have done.

The rest of the interior was fairly straightforward.  Parts that were available new I replaced.  Anything not available new I cleaned up and painted or polished.  One item not available new was the seat belts.  There was a company that would refurbish them for me.  But Instead I chose to clean them with laundry detergent and re-use them.  Next time around I do plan to have them professionally reconditioned.

Time For Paint

At the time I was first getting my car painted there were several types of paint that were in common use.  Most people either used lacquer or enamel based paints.  Polyurethane based paints were just starting to become popular.  I am not a paint expert, but I will share my understanding based on my friend’s experiences with painting their cars.

Back in those days many people painted their own cars in their garage.  Lacquer paint was pretty popular for this purpose.  It is a fairly soft paint and needs to be polished to get a really good shine.  For a home painter this was good because any runs or imperfections in the paint would be removed during the polishing stage.  But the polishing took a lot of work.  Charlie, my neighbor who worked as a mechanic owned a Camaro that he did all the work to, including paint.  Charlie’s Camaro had a Chevy small block and a 4 speed transmission along with some healthy gears in the rearend.  And Charlie didn’t baby his car.  He always drove it hard, including running it at the local drag strip.  I remember when he painted the car light blue in his garage.  The paint was lacquer and it had a nice shine to it after he got it all buffed out.  Unfortunately he also managed to chip the paint in the process.  That was the issue with lacquer.  It chipped fairly easily.

Enamel paints were supposed to be harder and could hold up to chipping better.  But being harder it was also more difficult to polish to get it to shine.  Professionals had the equipment, but most home garage mechanics didn’t.  So it had to be laid on pretty much teh way you wanted it to look.  Also, lacquer was very popular at the time for show cars.  Custom painters liked it because they could polish for that perfect shine.  So even though some car manufacturers used enamel at the factory it didn’t seem to be as popular with the people I knew.

Charlie’s brother Pete had a 1965 GTO that I really liked.  It had a few issues now and then.  When he bought the car it had wheel locks, but no wheel lock key.  Another friend who lived in the neighborhood, John, was just the guy to solve this type of problem.  I could probably fill a whole blog just with stories about the trouble John used to get into.  Anyway, John made short work of the wheel locks using a chisel and a hammer.  I helped Pete with some wiring issues on the car.  I remember being stranded with him one day when the car stalled and wouldn’t start.  Looking under the hood we found that the wiring harness had somehow gotten wrapped around the steering column.  Between the two of us we got it unwrapped enough to get us home.  But the reason I mention Pete’s GTO is because he planned to paint it red using this new type of paint made by Dupont called Imron.  It wasn’t lacquer or enamel based, but was polyurethane.  It was supposed to shine and also be extremely tough so that it could hold up to parking lots and everything we put our cars through.  Pete did get it painted and I thought it looked pretty sharp.  Pete sold the car when he removed everything from the trunk and discovered that he could see straight through to the ground.  Rust had taken its’ toll on the old GTO.

When I discussed painting my car with the painter I had found, he stated that his preference was to use enamel paint. He mixed in a hardener so that it would be even more chip resistant.  This all sounded good to me because I intended to use the car as my daily driver.  I left the car and new chrome trim at the paint shop and patiently waited to hear back about my car from Rick.  I was invited to come visit every once in a while to see the progress being made.  To me everything was looking good.  Years later I discovered that some of the body work involved using pop rivets to hold metal patches in place.  But you couldn’t tell from looking at it.  The paint was shiny, the body was fairly straight, and the new chrome trim looked great.  Unfortunately a fly landed on the hood while the paint was wet.  They promised to fix ti for me but they never did.  I also requested they give me a receipt for the work so I could prove the value of the paint job to my insurance company.  Apparently this was a problem for them.  Eventually I got a receipt with completely bogus signatures on it.  It seems that standing behind their work was asking too much from them.  I ran into the younger painter a couple of years later and he said he now understood why I wanted a receipt for my insurance company.  Turns out he was in an accident and was having a disagreement with his insurance company on the value of the car.  Some people have to learn things through hard experience.

Here’s how the car looked when I got it back from the painters. I took these pictures on a fairly cloudy day.

img867

img868

img869
Looks like I hadn’t gotten all of the trunk letters back from being re-chromed yet

img870
In the background is my Mom’s 1976 Camaro. In the driveway way in the background is James’ Camaro. I think it was 1967 but i may have that wrong. That car was painted blue and had the stripes on the hood. Wish I had a close-up picture as that car really looked nice.

Restoration Continued

At this point I was making fairly regular trips to purchase parts.  The store I was buying from was Pony and Corral as they were the only Mustang parts specialist store in the area at that time.  It was run by Bill and I found him to be fair, honest, and trustworthy, unlike the prior Mustang specialist I had worked with.  Most of what I was purchasing were trim pieces.  My car was missing the grille and some of the trim.  Much of the other trim was rusted or scratched.  And a good deal of the weatherstripping was worn out and needed to be replaced.  My plan was to install the GT emblems and stripes in place of the standard Mustang emblems.  I also ended up purchasing front and rear valances, the other front fender, and a used trunk lid.  Most of these last body parts I installed myself in the driveway.  The trim and weatherstrip I put away until after the car was painted.  Finding a shop to paint the car was my next challenge.

After having been burned by the previous body shop, I was confused as to how to find a decent body shop I could trust.  Right around that time a friend of mine named Rick started working for a golf car company.  Rick did mechanical work, but the company also had a body shop.  The body shop repaired golf cars that had sustained body damage, presumably by drunken golfers who crashed them.  One of Rick’s friends was interested in painting my car.  We arranged for a date and time when I could bring the car by for him to look at and work up an estimate for body work and paint.

The day arrived and I drove over to the golf car shop and met with Rick’s friend.  We talked for a little bit to discuss my plans for the car.  Then he looked the car over.  I was careful to point out any rusted areas I was aware of.  He ended up giving me an estimate of around $750 to do the bodywork and paint the car.  I also noticed that while we were talking somebody else in the shop was watching us carefully.  In the end I felt that the price was fair for the work to be done and we agreed that I would bring the car back in a few weeks after he could give me a firm date.  I left and went home to wait for Rick to let me know when to bring my car in.

A couple of days later Rick let me know that the arrangement for painting my car needed to be modified.  It turns out that the man in the shop watching us was the boss of the paint shop and he wanted in on the deal.  Rick said I needed to bring my car back and have him look it over and give me a revised estimate.  So back I went.

When I brought the car back I was told by the boss that any agreements I had made with his employee were off the table as he wanted to renegotiate.  I repeated the discussion regarding my plans for the car and then he proceeded to inspect my Mustang.  In the end he came up with a price of $750 to paint the car, which was the same price I had gotten before.  We set a date for me to deliver the car to him and I went home to patiently wait for the day to arrive.

Starting Restoration

At this point I was back from college and working full time.  Classic Mustangs were becoming a pretty hot item.  Jim Smart was collecting and publishing data on them.  Parts vendors and restoration shops that specialized in those cars were popping up all around the country.  Two of them local to me were Pony and Corral and Mustang Magic.  Neither of them are still in business, but I spent quite a bit of money at both of them on parts and repairs over the next few years.

So I chose to jump on the “restoration” bandwagon.  The body of this car was in pretty sad and rusted shape at this point.  The drive train and suspension were still in serviceable shape, so I concentrated on the body to start.  The first step was to have the rear quarter panels replaced as they were pretty badly rusted.  I shopped around and chose to have a company that specialized in Mustangs called Pony Car Specialists do the installation.  The “owner” of the company was a woman named Cindy.  Unfortunately a lot of the Mustang specialists were very much “fly by night” companies that had no business being in that line of work at all.  Unfortunately the company I chose was one of those.  Their prices for parts were just a little bit better than everybody else.  But their bodywork was about as bad as it gets.

I spoke with Cindy on the phone and drove my car over to her “shop”, which turned out to be her house.  She and her mechanic looked the car over and agreed to repair both rear quarter panels, one of the front fenders, and repair the rusted floors.  I left the car and was told it would be a few weeks.  I waited patiently and eventually got the call that the car was done.  I was given a different address to pick up the car, which was the first thing I thought was strange.  That address turned out to be the home address of the body mechanic. When I looked at my car I could see that the quarter panels and fender had been replaced.  The alignment on the quarter panels was beyond atrocious as they weren’t even close.  Where they had been tacked on was covered with about 1/2″ of body putty that hadn’t been sanded down.  The fender had emblem holes drilled in the wrong place, and for the wrong emblems.  The floor hadn’t even been touched.  I complained and refused to pay until the work was completed satisfactorily.  The mechanic agreed to make the repairs, but it would take additional time.  I agreed to give him the time he required.  I also complained to Cindy, but she wasn’t interested in getting involved, claiming that she only handled the parts and had nothing to do with the body work.  Shows what kind if business person she was.  Not even willing to stand behind her own company’s work.  That speaks volumes about her and her bogus company.

A few days later I get a call telling me my car was now ready.  I drove over to the mechanic’s house to inspect the work.  The front fender was untouched since the last time.  The putty on the rear quarter panels had been sanded down a bit, but weren’t looking much better and the alignment still wasn’t even close.  The floors had been sanded a little but I could still see through some pinholes where they were rusted out.  This time the mechanic wasn’t even there, so I spoke with his father.  Again I said the work wasn’t acceptable and I would not pay until it was completed.  The father tried to argue with me some but in the end they kept the car for a few more days to make another attempt at finishing the work.

A few days later I got another phone call that the car was ready again.  I drove over to take a look and see if my concerns had been addressed.  Once I arrived I looked the car over.  No change on the quarter panels or fender.  The floor had a metal plate welded over top of one of the rusted areas.  The rest of the floor was unchanged and covered with surface rust.  I was told that the car must have been in an accident in the past which caused the quarter panels to be out of alignment, so he was unable to align them properly.  I pointed out that the panels were aligned much better before he replaced them and that his job which I had hired him to do was to repair the damage.  I also noticed that the car had about 100 miles more on the odometer than when I dropped it off.  When I questioned him about this it seems he had been using the car for transportation while he was working on it.  We haggled for a while and finally agreed on a reduced price for the work since I was going to have to get it repaired again somewhere else.  I drove the car home and tried to move on.

Once I got home I found a few more problems with the work that had been done.  The next day the car wouldn’t start which surprised me since I had purchased a new battery just a month prior.  Upon opening the hood I found my battery with a big fiberglass patch on it and evidence of battery acid having been sprayed around the engine compartment.  I called the mechanic once again to ask what had happened to my new battery.  Seems he had managed to cause the battery to fall out of the battery tray and hit the fan while he was joy riding in my car.  So now i needed a new battery to replace my new battery.  We negotiated for him to refund some money to pay for that.

Other problems I found over time was that the bottom of the fender he had installed was welded on rather than being bolted on.  I discovered this the first time I tried to remove the fender.  When he replaced the rear quarters he had welded the rear valance on as well rather than bolting it on.  He had snapped off a couple of the bolts where the bumper brackets attached to the frame. which I had to drill out and replace.  And then to add insult to injury the 1/2″ thick body putty covering the seam where he had welded on the quarter panels started bubbling up and cracking as the quarter panels both came loose.

None of this had gone the way I had hoped, and I had to have almost all the work I had paid for done over.  Chalk that one up to experience I guess.  I learned that anybody can call themselves a “specialist”, but that doesn’t make it true.  Next step was to start collecting some additional parts and prepare for a trip to the next body shop.  At least as soon as I could find one I could trust.

Off To College

Now I had completed high school and was ready to move on to college.  And of course my trusty Mustang accompanied me.  I chose to go to school at a small college located in the western part of Maryland.  That part of Maryland gets a fair bit of snow during the winter.  Typically it starts sometime in October and snow remains on the ground until Spring.  So I added a pair of snow tires to the back of the car and survived several winters that way.  During this time I pretty much drove the car as is, only fixing any safety related issues that came up.  The car was subjected to plenty of snow, salt, and other chemicals they used to treat the roads.  Needless to say the car took quite a beating during those years.  Big block Mustangs probably aren’t most people’s first choice for a winter beater.  But it served me well during those years and I learned how to drive that car in the snow pretty well.

Every Spring after the snow started melting and the campus roads were clear, I used to see a Boss 429 Mustang driving along the main road through campus.  I didn’t see it very often as the owner only brought it out on nice sunny days.  After seeing that car several times over the next few years I eventually stumbled on where it was kept.  One day I was walking through the town and I saw the door open up on a small white one car garage.  I head a car start up inside the garage.  The exhaust note sounded pretty healthy so I kept watching.  A car slowly backed out of that garage.  It was the Boss 429 Mustang I had been watching over the past several years.  It sat in the driveway and idled as the owner allowed it to warm up while he closed the garage door.  The exhaust note sounded pretty amazing.  Those engines had a sound all their own and you didn’t get to hear one very often, even back then.  That was in the mid 1970s and was the only time I saw that particular car going in and out of that garage.  I sometimes wonder whether that garage is still there and still houses that particular Mustang or not.  One of these days I may make the trip (about 150 miles) to look and see.